Install a new Digital Archive site
This page explains all of the tasks that AvantLogic performs to install and configure a new Digital Archive installation. For each task, it lists the steps necessary to perform the task.
Step by step
Installation tasks appear in the navigation panel at left. Perform them one at a time in the order listed.
Prerequisites
Hosting requirements
The web host must be an Apache web server that satisfies the system requirements for Omeka Classic. AvantLogic uses InMotion Hosting as its host.
These instructions assume that the host has cPanel. If you don't have cPanel, see Installing on a bare Linux server.
Site name
Some of the installation steps require that you specify a site name. Choose a concise and
meaningful name that you and others will recognize when performing system administration. An acronym
is usually a good choice. For example, the site name for the Southwest Harbor Public Library is swhpl.
Site folder
The files for a Digital Archive installation reside in what this documentation refers to as the site folder. The location of the folder varies depending on whether the installation is standalone (has its own cPanel account on the server) or is a subdomain installation (shares the same cPanel account as other installations).
Standalone installation folder
On a standalone installation, the Digital Archive files will be installed in /public_html/digitalarchive. AvantLogic uses
the digitalarchive folder to isolate the Digital Archive files
from other applications on the web server. For example, some installations use a digitalarchive
folder and a wp folder side-by-side where the wp folder contains a WordPress application
for content related to the Digital Archive collection. If would be very messy, and
make application updates difficult, if the Digital Archive and WordPress files were
together in the same public_html.
Do not create the digitalarchive folder at this time.
It will get created later during the Install Omeka Classic files step.
Subdomain installation folder
On a subdomain installation, the Digital Archive files will be installed in /domains/site-name for a subdomain e.g. demo.digitalarchive.us.
Create the subdomain now before continuing.
- Go to cPanel for
digitalarchive.us - Use the
File Managertool to create a new subfolder in thedomainsfolder e.g./domains/demo - Choose the
Domainstool - Click the
Create a New Domainbutton - Enter the domain name e.g.
demo.digitalarchive.us - Enter the document root e.g.
/domains/demo - Leave the share document root option unchecked
- Click the
Submitbutton
MySQL database
Follow the steps below to use cPanel to create a new empty database and a database user for the Digital Archive installation.
Standalone installation
Create a database
Important
cPanel will automatically prefix any database or user name that you choose with the
first seven letters of the domain name, followed by _. For example, if you specify
the name omeka and the domain name is swhpl the actual name will be shwpl_omeka.
Keep this in mind because the name you choose will really be a suffix.
- In WHM, select the account where the installation will be performed
- Go to cPanel and choose
MySQL Database Wizard - In wizard Step 1 Create a Database:
- Decide on the database name suffix
- A good choice is
omeka
- A good choice is
- Enter the suffix in the New Database field
- Decide on the database name suffix
- Click the
Next Stepbutton
Note
If you want to populate the new database with data from an existing Digital Archive database, follow the instructions to copy a MySQL database.
Create a user
- In wizard Step 2 Create Database Users:
- Decide on the user name suffix
- A good choice for a standalone installation is
archivist - A good choice for a subdomain installation is
admin
- A good choice for a standalone installation is
- Enter the suffix in the Username field
- Decide on the user name suffix
- Click the
Password Generatorbutton - In the popup dialog:
- If you don't like the password, click the
Generate Passwordbutton to get another - Copy the password to a password vault or other safe place
- Click the checkbox confirming that you copied the password to a safe place
- Click the
Use Passwordbutton - The two password fields get filled in with the generated password automatically
- If you don't like the password, click the
- Click the
Create Userbutton - In wizard Step 3 Add user to the database:
- Check the
ALL PRIVILEGEScheckbox at the top - Click the
Next Stepbutton
- Check the
subdomain installation
Create a database
- Go to cPanel and choose
MySQL Databases - In the Create New Database section enter the site name e.g.
demoas the database name - Click the
Create Databasebutton - On the database added page, click
Go Back - In the Add User To Database section
- Choose
daus_adminas the user - Choose the new database name as the database e.g.
daus_demo - Click the
Addbutton
- Choose
- On the Manage User Privileges page
- Check the
ALL PRIVILEGESbox - Click the
Make Changesbutton
- Check the
Configure MySQL Workbench
This step is only necessary for a standalone installation. For a subdomain installation, the new
database will already be availale in MySQL Workbench as one of the digitalarchive.us databases.
Omeka installation
Copy installation files to server
Follow these steps to upload the Omeka Classic files to the web server. You can also read Omeka's installation instructions.
- Download the latest Omeka Classic release from http://omeka.org/classic/download
As of 11/22/2023, the latest release wasomeka-3.1.2.zip - Go to cPanel and choose
File Manager
Standalone installation
- Navigate into the
public_htmlfolder - Upload and extract the zip file
- A new folder having the same name as the zip file will appear
- Rename the new folder from the zip file's name to
digitalarchive - Delete the zip file.
- Copy
C:\laragon\www\favicon.pngto thepublic_htmlfolder
Subdomain installation
- Navigate into the site folder e.g.
domains/demo - Upload and extract the zip file
- A new folder having the same name as the zip file will appear
- Navigate into the new folder
- Select all of the files and move them to the site folder e.g.
domains/demo - Navigate back up to the site folder
- Delete the zip file
- Delete the now empty folder having the same name as the zip file
- Copy
C:\laragon\www\favicon.pngto the site folder
Edit database configuration
Follow these steps to configure Omeka to use the database you created. The username, password, and dbname values come from the create MySQL database task.
- Go to cPanel and choose
File Manager - Navigate into the site folder
- Edit
db.ini - Replace occurrences of
"XXXXXXX"as follows:- host =
"localhost" - username = "database username"
- password = "database password"
- dbname = "database name"
- prefix =
"omeka_" - charset =
"utf8" - Leave port commented out
- host =
- Save your changes and close the file
To learn more, see the Omeka documentation for the database configuration file.
Important
The db.ini file tells Omeka how to access the database. Any errors, typos, or incorrect information
in this file will prevent Omeka from running and result in the display of a fatal error.
Enable error reporting and HTTPS
This step allows PHP errors to appear in the browser. Normally you would not want this for a production site, but it's better to become aware of a problem if it occurs.
In these steps you'll also add code to force URLs to https. The code gets added here and in the root-level .htaccess file
and in the steps to configure site security.
- Go to cPanel and choose
File Manager - Allow hidden files to be displayed:
- Click the
Settingsbutton in the upper right of the File Manager - Check the box for
Show Hidden Files
- Click the
- Navigate into the site folder
- Edit
.htaccess - Uncomment
SetEnv APPLICATION_ENV development - Add the code below to force URLs to HTTPs
- Save your changes and close the file
Put the code below immediately after the line RewriteEngine on
# Force all URLs to HTTPS
RewriteCond %{HTTPS} off
RewriteRule (.*) https://%{HTTP_HOST}%{REQUEST_URI} [R,L]
Enable error logging and background process
Follow these steps to enable Omeka error logging so that a history of errors will be recorded. To learn more, see the Omeka documentation for retrieving error messages.
- Go to cPanel and choose
File Manager - Navigate into the site's
application/config/folder - Edit
config.ini - Change
log.errorsfromfalsetotrue - Change
background.php.pathfrom blank to/usr/local/bin/php - Save your changes and close the file
Errors are written to:
digitalarchive/error_log- Okay to delete – it gets recreated automatically. Shows PHP errors.
digitalarchive/admin/error_log- Okay to delete – it gets recreated automatically
digitalarchive/application/logs/errors.log- Must exist – will get Omeka error if not present and writable.
If the file gets too big for cPanel to allow editing, you can delete the file and create a new one with the same name.
- Must exist – will get Omeka error if not present and writable.
If errors are not appearing in the browser, make sure that display_errors=On and error_reporting=32767 (or E_ALL). These two settings can be applied in php.ini, but since there can be multiple php.ini files, it's not always clear which applies.
Omeka configuration
You are now ready to launch Omeka and configure site settings.
- Open a browser using the URL for the
digitalarchivefolder, for example:avantlogic.net/digitalarchive.
The Omeka Configure Your Site page should appear.

Enter configuration settings
You can now configure the Omeka site. See the Omeka general settings documentation and the appearance settings documentation for an explanation of the configuration settings.
Super user
The username and password you will specify below are for an Omeka super user.
See Omeka terminology to learn what it means to be a super user.
- Set:
- Username: a super user name
- Password: super user password
- Re-type the Password: super user password
- Email: a valid email address
- Administrator Email: same as Email
- Site Title: the organization name
- Site Description: leave blank
- Site Copyright Information: the organization name
- Site Author Information: your name or company
- Tag Delimiter:
,(a comma) - Fullsize Image Size:
600 - Thumbnail Size:
300 - Square Thumbnail Size:
100 - Items Per Page (admin):
50 - Items Per Page (public):
50 - Show Empty Elements: Unchecked
- ImageMagick Directory Path:
/usr/bin
- Click the
Installbutton - You should see the
Success!page.

- Click the
Admin Dashboardbutton - Login with the super user user name and password
- Check the
Remember Mecheckbox - Click the
Loginbutton - The
Dashboardpage should display.
Configure additional settings
Follows these steps to finishing configuring Omeka.
Appearance settings
- On the
Dashboard page, clickAppearancein the top menu bar - Click
Settingsin theAppearancepage menu bar - At the bottom of the page, uncheck
Show Element Set Headings - Click the
Save Changesbutton
Search settings
- Click
Settingsin the top menu bar - Click
Searchin theSettingspage menu bar - Uncheck all
Search Record TypesexceptItem - Click the
Save Changesbutton
General settings
- Click
Generalin theSettingspage menu bar - Click the
Testat the bottom of the page
You should seeThe ImageMagick directory path works - If the message says that the path does not work:
- Go to cPanel and choose
Terminal - In the terminal window, type
which convertand pressEnter - Use the response to determine the correct path and try again or contact your host's technical support and ask them to tell you the path
- Go to cPanel and choose
Change database storage engine
This step is only necessary when using AvantSearch without AvantElasticsearch.
These steps change the storage engine for the search_texts table from MyISAM to InnoDB. They also add a FULLTEXT index to the title column of the search_texts table. To learn the reason for making these changes, see the AvantSearch
plugin topics on improving search results
and the Titles Only option.
Follow these steps to change the storage engine:
- Go to cPanel and choose
phpMYAdmin - In the left panel, click on the Omeka database name to see its tables
- Click on the
omeka_search_textstable in the left panel - Click on the
Operationstab - In the
Table Optionssection, change Storage Engine fromMyISAMtoInnoDB - Click the
Gobutton in the lower right of the section - Click on the
omkea_search_textstable - Click the
Structuretab - On the row for
title, clickFulltextamong the actions at the far right. If the browser window is too narrow to see all the options, click onMoreand chooseFulltextfrom the dropdown menu - On the
Confirmdialog click theOKbutton to alter the table Titlenow appears in theIndexessection showing with Type asFULLTEXT- Close the phpMyAdmin browser tab
Web server settings
Disallow bots
Crawling of Digital Archive sites by Google and other major search engines is generally a good thing;
however, some commercial bots can hit a single Digital Archive site as often as 100,000 times a day or more.
The robots.txt file is used to block specific bots while allowing others to access the site. As of
September 2020, the bots listed below were the worst offenders, though their behavior was not malicious.
To see bot traffic, use the cPanel tool Awstats and click the Robots/Spiders visitor link in the left panel.
Edit (or create) public_html/robots.txt to contain the content below:
User-agent: *
Disallow: /files/

User-agent: AhrefsBot
Disallow: /

User-agent: SemrushBot
Disallow: /
Configure PHP settings
- Go to cPanel and choose
MultiPHP INI Editor - Select the
Basic Modetab - Choose the site from the dropdown menu
- Set:
- max_execution_time: 120
- memory_limit: 512M
- post_max_size: 128M
- upload_max_filesize: 128M
- Click the
Applybutton
Verify PDF support
These steps verify that a program called pdftotext is installed on the web server.
It is used by the AvantElasticsearch plugin to
make PDF files searchable. If you won't be using AvantElasticsearch, you can skip this task.
- Go to cPanel and choose
Terminal - In the terminal window, type
pdftotext -vand pressEnter - The
pdftotextprogram should display its version - If instead you see
command not found, ask your host to installpdftotext
Verify that background processing works
Some Omeka operations are performed in the background. Examples are a request to reindex records and using the Bulk Edit plugin to perform bulk edits in the background.
Follow these steps to determine if the default configuration for background processing is working properly.
- Click
Settingsin the top menu bar - Click
Searchin theSettingspage menu bar - Click the
Index Recordsbutton (even though there are no records to index) - You should see a green message
Indexing records. This may take a while... - If instead you get an error that the configured PHP path is or does not point to a PHP-CLI binary:
- Edit
digitalarchive/application/config/config.ini - Set
background.php.pathto the correct path for the server e.g./usr/local/bin/php - Save changes and close the
config.inifile - Verify that the Index Records operations works with no error
- Edit
Finding the right path might be a trial and error process. Leaving background.php.path = "" works correctly on some servers. On others it needs to be set to /usr/local/bin/php or /usr/bin/php-cli.
If you are not successful, contact the host to ask for the right path. Also read the next section.
Installations that don't support background processing
Some installations such as XAMPP on Windows might not support background processing. In that case, you can
have background jobs run in the foreground. To do this, edit the Omeka core file /application/config/config.ini
as shown below:
jobs.dispatcher.default = "Omeka_Job_Dispatcher_Adapter_Synchronous"
jobs.dispatcher.longRunning = "Omeka_Job_Dispatcher_Adapter_Synchronous"
;jobs.dispatcher.longRunning = "Omeka_Job_Dispatcher_Adapter_BackgroundProcess"
When upgrading to a new release of Omeka, make sure that you edit the file again.
Plugin acquisition
It is now time to acquire the zip files containing the plugins, and the theme, required by the Digital Archive. This section explains where to locate the files and how to add them to the installation so that later you can install and configure them and each plugin. To add them means to upload them to the web server and extract them into the proper installation folders.
Get Digital Archive zip files
The following zip files are required for most Digital Archive installations. All the files are located on GitHub. The link on the zip file name takes you to the GitHub repository for that file.
| Type | Plugin Name | Zip file name |
|---|---|---|
| Omeka plugin | ArchiveRepertory | ArchiveRepertory 2.15.7.zip |
| Avant plugin | AvantAdmin | AvantAdmin-master.zip |
| Avant plugin | AvantCommon | AvantCommon-master.zip |
| Avant plugin | AvantCustom | AvantCustom-master.zip |
| Avant plugin | AvantDPLA | AvantDPLA-master.zip |
| Avant plugin | AvantElasticsearch | AvantElasticsearch-master.zip |
| Avant plugin | AvantElements | AvantElements-master.zip |
| Avant plugin | AvantImport | AvantImport-master.zip |
| Avant plugin | AvantRelationships | AvantRelationships-master.zip |
| Avant plugin | AvantS3 | AvantS3-master.zip |
| Avant plugin | AvantReport | AvantReport-master.zip |
| Avant plugin | AvantSearch | AvantSearch-master.zip |
| Avant theme | AvantTheme | AvantTheme-master.zip |
| Avant plugin | AvantZoom | AvantZoom-master.zip |
| Omeka plugin | BulkMetadataEditor | BulkMetadataEditor.zip |
| Omeka plugin | Geolocation* | Geolocation.zip |
| Omeka plugin | OaiPmhRepository | OaiPmhRepository-master.zip |
| Omeka plugin | SimpleVocab | SimpleVocab-2.2.2.zip |
* Indicates that the Omeka plugin has been modified by AvantLogic for the Digital Archive
Get Avant plugin or theme zip file
Follow these steps to locate and download each zip file one at a time:
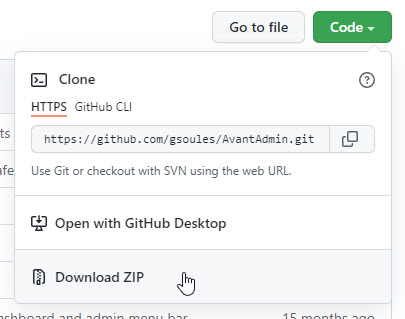
-
Click on a link in the table above to go to the GitHub repository for the file
-
If the link takes you to the main repository page:
- Be sure that the latest revision is what you want.
If in doubt, download the latest release instead. - Click the green
Clone or downloaddropdown as shown below - Choose
Download ZIP - Save the file to a folder on your computer
- Be sure that the latest revision is what you want.
-
If the link takes you to a release page:
- Click the link for the
.zipasset (pointed to by the arrow below) - Save the file to a folder on your computer
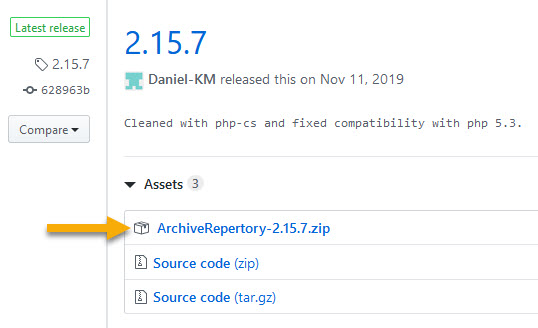
- Click the link for the
The sections that follow assume that you are familiar with the process to upload and extract a zip file.
Upload and extract the theme
- Upload
AvantTheme-master.zipintopublic_html/digitalarchive/themes - Extract
AvantTheme-master.zip - Click the cPanel
Reloadmenu item to see the resulting folder - Delete
AvantTheme-master.zip - Rename the
AvantTheme-masterfolder toAvantTheme
Upload the plugin zip files
- Go to the folder where you downloaded the zip files
- Select all the files, except for the theme
- Right click the selection and choose
Send to>Compressed (zip) folder
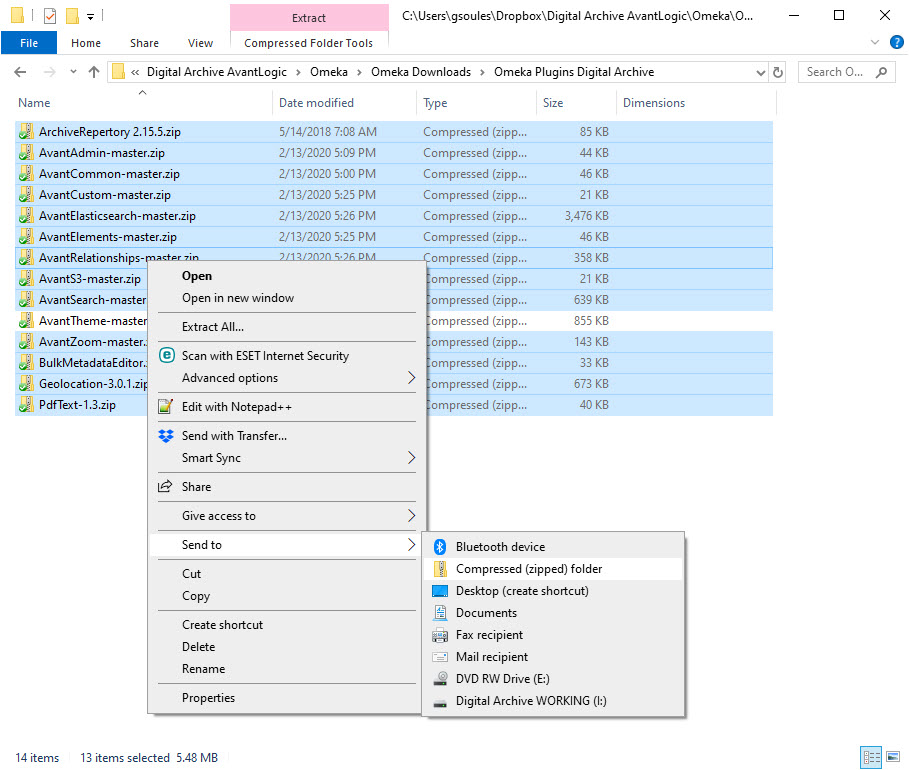
- Rename the newly created zip file to
plugins.zip - Upload
plugins.zipintopublic_html/digitalarchive/plugins - Extract
plugins.zipto get the individual plugin zip files - Delete
plugins.zip
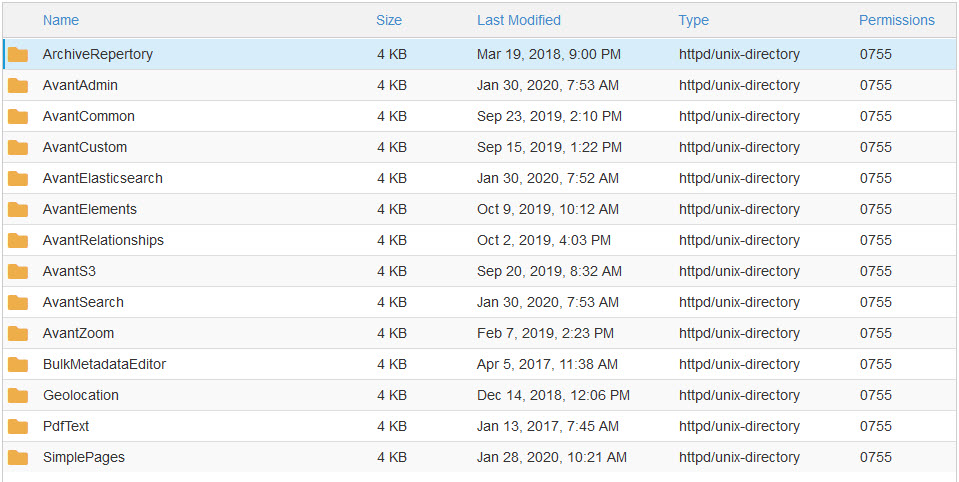
Extract individual plugin zip files
For each of the plugin zip files:
- Extract the zip file
- Click the cPanel
Reloadmenu item to see the resulting folder - Delete the zip file
- Rename the folder to remove
-master
There does not seem to be a way to extract all of them at once.
Remove unused plugins
Delete these two folders for plugins that the Digital Archive does not use:
public_html/digitalarchive/plugins/Coins
public_html/digitalarchive/plugins/ExhibitBuilder
The plugins folder on the web server should now look like this:
AvantTheme configuration
AvantTheme, and many of the AvantPlugins, depend on the AvantCommon plugin being installed. Before you can install the theme, install AvantCommon by following these steps:
- Login to Omeka as a super user
- Click
Pluginsin the top menu bar - Many of the plugins added in the previous task will be shaded in pink
- Click the
Installbutton for AvantCommon - On the
Configure Plugin: AvantCommonpage:- Don't enter any values for now
- Click the
Save Changesbutton
- The pink shading should be gone from all of the plugins except for AvantLocation, AvantRelationships, AvantReport, and AvantVocabulary.
- Click
Appearancein the top menu bar - On the
Themespage, click theUse this themebutton for AvantTheme - AvantTheme is now the current theme
Remove unused themes
- Use cPanel to navigate into
public_html/digitalarchive/themes - Delete all the theme folders except AvantTheme
Item elements definition
Omeka installs with a number of different Item Types and Elements; however, the Digital Archive uses only one Item Type which contains all of the Dublin Core elements plus only those additional elements that the organization needs. Having just one Item Type makes data entry easier and faster. To learn more, see the Omeka documentation for Item Types.
Follow the steps below to remove unused Item Types and Elements and create a single Item Type having the elements needed by the organization.
Delete unused item types
- Open the database in MySQL Workbench
- Right click on the
omeka_item_typestable and chooseSelect Rows - Select all the rows
- Right click on the selection and choose
Delete Rows - Click the
Applybutton in the lower right - Click the
Applybutton on theApply SQL Script to Databasedialog - When the deletion completes, click the
Finishbutton
Delete unused elements
- Right click on the
omeka_elementstable and chooseSelect Rows - Select all the non Dublin Core element rows. Those rows have an
element_set_idvalue of3and are namedText,Interviewer,Intervieweeetc. - Right click on the selection and choose
Delete Rows - Click the
Applybutton in the lower right - Click the
Applybutton on theApply SQL Script to Databasedialog - When the deletion completes, click the
Finishbutton
You can now quit MySQL Workbench.
Create a new Item Type
- Login to Omeka
- Click
Items Typesin Omeka's left admin menu - Click either of the green
Add an Item Typebuttons - For Name use the site name in all caps, for example
NEHLfor Northeast Harbor Library - Leave the description blank
- Click the
Add Item Typebutton
The new Item Type contains all of the Dublin Core elements. If you know what other elements the organization needs, you can add them now, or you can add additional elements as the last task of the installation. The Administrator documentation explains how to add a new element.
Add additional elements
See the Administrator documentation on how to add a new element.
Also, arrange the order of all elements.
Arrange element order
The default order in which the Dublin Core elements appear when editing an item is not suitable because the Identifier and Type fields appears near the end. Follow the instructions to arrange the element order into the recommended sequence for the Digital Archive.
FTP access
This section describes how to set up FTP access for a superuser.
This is an optional step during installation. It can be done later if/when the organization needs FTP access e.g. to upload zoom tiles.
Set up superuser FTP access
Follow these steps to access the Digital Archive web server via FTP.
Note
The settings below are for the site's primary FTP account which can use the SSH protocol. The settings for a limited FTP account are restricted to using the FTP protocol. To learn more see this post.
- Run FileZilla
- Choose
File>Site Managerfrom the top menu bar - On the
Site Mangerdialog click theNew sitebutton - Fill in the site name in the
My Sitestree - On the
General Tabset:- Protocol:
SFTP – SSH File Transfer Protocol - Host: Example:
ftp.mydomain.net - Port: leave blank
- Logon Type:
Normal - User: cPanel username
- Password: cPanel password
- Protocol:
- Click the
Connectbutton - On the
Unknown host keydialog:- Check the
Always trust this hostcheckbox - Click the
OKbutton
- Check the

Beyond Compare
Beyond Compare is a tool for comparing and synchronizing local files and folders with their remote counterparts on the Digital Archive server. It does this using its builtin FTP support.
To add a Digital Archive site to Beyond Compare, you need to specify the location of the local site
and the remote site and then save two comparison sessions, one for the themes folder and one for the
plugins folder.
Create theme comparison session
- Run Beyond Compare
- Click on the
Folder Compareoption on the home page - Set the local site
- Click the folder icon in the upper right of the left pane
- Click
Local File Systemin the left panel - Navigate to
C:\laragon\www\omeka-2.6in the right panel - Click the
OKbutton
- Set the FTP site
- Click the folder icon in the upper right of the right pane
- Click on
Quick Connect>FTP Profilein the left panel - Enter the FTP credentials for the remote server
- Click the
Connect & Browsebutton to verify that you can access the site - Click the OK button
- In each pane:
- Navigate to the
themesfolder - Right click on the folder and choose
Set as Base Folder
- Navigate to the
- On the main menu, click
Session>Save Session As - In the
Save current settings asfield, type e.g.SWHPL Theme - In the
Create intree clickDigital Archive - Click the
OKbutton
Create plugin comparison session
- In each pane:
- Navigate to the
pluginsfolder - Right click on the folder and choose
Set as Base Folder
- Navigate to the
- On the main menu, click
Session>Save Session As - In the
Save current settings asfield, type e.g.SWHPL Plugins - In the
Create intree clickDigital Archive - Click the
OKbutton - In the top menu bar click
Session>Session Settings... - On the
Session Settingsdialog click theName Filterstab - Past the list below in the
Exclude folders:panel - Click the
OKbutton
.git
.\ArchiveRepertory
.\AvantDpla
.\AvantElasticsearch\vendor
.\BulkMetadataEditor
.\CsvExport
.\Dropbox
.\ExhibitBuilder
.\Gcihs
.\Geolocation
.\OaiPmhRepository
.\SimplePages
.\SimpleVocab
To rename or delete existing sessions, click on the Home button in the ribbon
and then access the session of interest in the Sessions tree at left.
Plugin installation
You are now ready to install the plugins that turn an Omeka installation into the Digital Archive.
At this point in the installation, the plugin files have been uploaded to the web server and will
appear on the Omeka Plugins page; however, most of the plugins have not yet been installed
as is evidenced by the green Install button.

Once a plugin is installed, it shows buttons that let you configure, deactivate, or uninstall it.

Install and configure the plugins in the order in which they appear in the sections that follow.
Archive Repertory
The Archive Repertory plugin controls where files are stored when you attach files, such as images or documents, to Omeka items.
Important
Install this plugin now before adding any items to Omeka because the plugin overrides Omeka's default file storage mechanism and it won't work correctly if some files have already been stored.
Follow these steps to install and configure the Archive Repertory plugin:
- Go to the Omeka
Pluginspage - Click the
Installbutton forArchive Repertory - Set:
- Collections option:
- How do you want to name ...:
Don’t add folder
- How do you want to name ...:
- Items options:
- How do you want to name ...:
Identifier - Prefix for Item: leave blank
- Convert folder names:
Full conversion to Ascii
- How do you want to name ...:
- Files option:
- Convert filenames:
Full conversion to Ascii - Keep only base...: Unchecked
- Convert filenames:
- Special derivative folders options:
- Other derivative folders: leave blank
- Process:
Omeka internal - Max size for downloads:
30000000 - Confirm downloaded: Unchecked
- Legal:
I agree with terms of use.
- Collections option:
- Click the
Save Changesbutton
Verify that the plugin is working as expected.
Add a test item
- Click
Itemsin Omeka's left admin menu - Click the
Add an itemlink - Enter
12345in the Identifier field - Enter
Test 1in the Title field - Click the
Add Itembutton
Upload a test image
- Click
Itemsin Omeka's left admin menu - Click the
Editlink under theTest 1item - Click on the
Filestab at the top of the page - Click the
Choose Filebutton - Browse for an image
- Click the
Save Changesbutton - You should now be on the
Itempage for new item. - Use FTP or cPanel to navigate to the
/digitalarchive/filesfolder - Verify that the subfolders (
fullsize,originaletc) contain a subfolder named12345 - Verify that the
12345folder contains the uploaded image
Delete the test item
- On the
Itempage, click theDeletebutton - Click
Deleteon theAre you suredialog - Verify that the
12345folders got deleted from the/digitalarchive/filesfolders
Do not attempt to add any more items until the installation is completed including setting up AvantElasticsearch and AvantVocabulary.
If using Filezilla, you may need to disconnect and reconnect to verify that the files got deleted because the Refresh option does not always seem to work. Or do the verification using the cPanel File Manager.
Bulk Metadata Editor
Follow these steps to install Bulk Metadata Editor:
- Go to the Omeka
Pluginspage - Click the
Installbutton forBulk Metadata Editor - The plugin has no configuration options
Geolocation
Skip this task if the installation will not be using the Geolocation plugin.
The only Digital Archive installation that has the Geolocation plugin installed is Southwest Harbor Public Library and it uses a version modified by AvantLogic; however, the Library has deactivated the plugin because too much advertising shows up in the maps.
Follow these steps to install the Geolocation plugin:
- Go to the Omeka
Pluginspage - Click the
Installbutton forGeolocation - Configure the plugin as appropriate for the installation
- Click the
Save Changesbutton
OAI-PMH Repository
Skip this task if the installation will not ingested by the Digital Public Library of America.
Follow these steps to install the OAI-PMH Repository plugin:
- Go to the Omeka
Pluginspage - Click the
Installbutton forOAI-PMH Repository - Configure the plugin as appropriate for the installation
- Click the
Save Changesbutton
Simple Pages
Simple Pages has no configuration options.
Follow these steps to install the Simple Pages plugin:
- Go to the Omeka
Pluginspage - Click the
Installbutton forSimple Pages - Go to the Omeka
Settings>Securitypage - Uncheck the Enable HTML Filtering checkbox to allow all HTML tags such as
<img>
Notes
When adding Simple pages, be sure to check the box for Publish this page? so it will show
up in the Omeka navigation section.
Simple Vocab
You'll install the Simple Vocab plugin next because it is needed by the AvantElements plugin.
Follow these steps to install and configure the Simple Vocab plugin:
- Go to the Omeka
Pluginspage - Click the
Installbutton forSimple Vocab - Leave Apply to Files unchecked
- Click the
Save Changesbutton - Click
Simple Vocabin Omeka's left admin menu - Add vocabularies for the Rights, Subject, Type, and Place elements (see below)
- Click the
Save Changesbutton after specifying values for each element
Rights
In Copyright
In Copyright - Educational Use Permitted
In Copyright - Non-Commercial Use Permitted
In Copyright - Rights-holder(s) Unlocatable or Unidentifiable
No Copyright - United States
No Copyright - Non-Commercial Use Only
Copyright Not Evaluated
Copyright Undetermined
No Known Copyright
If you will be using the AvantVocabularyplugin, set Subject, Type, and Place as shown
below. Otherwise, provide the values you want.
Subject
Use the Vocabulary Editor to specify Subject terms
Type
Use the Vocabulary Editor to specify Type terms
Place
Use the Vocabulary Editor to specify Place terms
AvantAdmin
Follow these steps to install and configure the AvantAdmin plugin:
- Go to the Omeka
Pluginspage - Click the
Installbutton forAvantAdmin - Leave the
Maintenancecheckbox unchecked - Enter the Item Type name for the organization (usually all caps e.g.
SWHPL) - Click the
Save Changesbutton
AvantCommon
The AvantCommon plugin was installed as part of the task to install AvantTheme.
Follow these steps to configure the AvantCommon plugin:
- Go to the Omeka
Pluginspage - Click the
Configurebutton forAvantAdmin - Enter the Identifier as
Identifier - Enter an Alias if applicable or leave blank
- Enter any Private Elements
- Enter the Unused Elements shown below plus any others
Source
Contributor
Relation
Format
Language
Coverage
- Check the Enable Lightbox checkbox
- Leave Request Image URL blank
- Click the
Save Changesbutton
AvantCustom
AvantCustom has no configuration options. Follow these steps to install AvantCustom:
- Go to the Omeka
Pluginspage - Click the
Installbutton forAvantCustom - The plugin has no configuration options
AvantDPLA
Skip this task if the installation will not ingested by the Digital Public Library of America.
Follow these steps to install the AvantDPLA plugin:
- Go to the Omeka
Pluginspage - Click the
Installbutton forAvantDPLA - The plugin has no configuration options
AvantElements
Follow these steps to install and configure the AvantElements plugin:
- Go to the Omeka
Pluginspage - Click the
Installbutton forAvantElements - Enter the Display Order elements shown below plus any others
Identifier
Title
Type
Subject
Description
Creator
Publisher
Date
Rights
- Enter the Implicit Link elements shown below plus any others
Type
Subject
- Leave External Link blank
- Check the External Link Icon checkbox
- Enter the Validation specifiers shown below plus any others
Title: required, simple-text
Type: required
Creator: simple-text
Publisher: simple-text
Date: date
Rights: required
- Enter the Allow Add Input elements shown below plus any others
Title
Creator
Subject
- Leave Allow HTML blank
- Enter the Text Field specifiers shown below plus any others
Identifier: 70
Date: 160
Creator
- Enter the Vocabulary Field specifiers shown below plus any others
Type: 320
Subject: 320
Rights
- Leave Checkbox field blank
- Leave Read-only Field blank
- Leave Default Value blank
- Enter the Suggest elements shown below plus any others
Creator
Publisher
- Enter the Title Sync specifiers shown below plus any others
Creator
Publisher
- Enter the Custom Callback specifiers shown below plus any others
Identifier, default: DigitalArchive, getDefaultIdentifier
Identifier, validate: DigitalArchive, validateIdentifier
Rights, filter: DigitalArchive, filterRights
Date, filter: DigitalArchive, filterDate
<item>, validate: DigitalArchive, validateItem
- Verify that you have set all of the options correctly
- Click the
Save Changesbutton
Change Element Set order
- Click
Settingsin the top menu bar - Click the
Element Setstab - Click the
Editlink for Dublin Core - Reorder the elements by dragging them to the order shown below.
- Click the
Save Changesbutton
Identifier
Title
Type
Subject
Description
Date
Creator
Publisher
Source
Contributor
Rights
Relation
Format
Language
Coverage
AvantImport
Skip this task if the installation will not be importing items from a CSV file.
Follow these steps to install the AvantImport plugin:
- Go to cPanel and choose
File Manager - Create this folder:
public_html/digitalarchive/files/import - Go to the Omeka
Pluginspage - Click the
Installbutton forAvantImport - Leave Mappings blank
- Click the
Save Changesbutton
To learn how to use AvantImport, see how to import CSV data.
AvantRelationships
Follow these steps to install the AvantRelationships plugin:
- Go to the Omeka
Pluginspage - Click the
Installbutton forAvantRelationships - Set Visualization Preview to
At designated location - Set Max Direct Items to
6 - Set Max Indirect Items to
8 - Enter the Title Relationships specifier shown below plus any others
Creator: Created
Publisher: Published
- Leave Custom Relationships blank
- Leave Delete Tables unchecked
- Click the
Save Changesbutton
AvantSearch
Ignore the MyISAM warning if the installation will be using Elasticsearch.
Follow these steps to install and configure the AvantSearch plugin:
- Go to the Omeka
Pluginspage - Click the
Installbutton forAvantSearch -
Check the Titles Only checkbox
-
Enter the Columns specifiers shown below plus any others
Identifier, Item: 65, right
Title
Type
Subject
Creator
Publisher
- Enter the Layout specifiers shown below plus any others
L1, Details
L2, Type / Subject: Identifier, Title, Type, Subject
L3, Creator / Publisher: Identifier, Title, Creator, Publisher, Date
- Enter the Detail Layout elements shown below plus any others
Identifier
Type
Subject
Creator
Publisher
Date
<tags>
<score>
- Enter
Identifierfor Integer Sorting - Leave Address Sorting unchecked (will not be available if there is no
Addresselement) - Leave Elasticsearch unchecked (will not be available until AvantElasticsearch is installed)
- Click the
Save Changesbutton
AvantReport
AvantReport has no configuration options. Follow these steps to install AvantReport:
- Go to the Omeka
Pluginspage - Click the
Installbutton forAvantReport
AvantZoom
AvantZoom has no configuration options. Follow these steps to install AvantZoom:
- Go to the Omeka
Pluginspage - Click the
Installbutton forAvantZoom
To learn about using AvantZoom, see the documentation for zoomable images.
Create a Zoom folder
Follow these steps to create the folder used to store the tiles for zoomable images.
- Go to cPanel and choose
File Manager - Create these two folders within the
filesfolder of the site folder:files/zoomfiles/zoom/images
- Copy the OpenSeadragon icons from
public_html/digitalarchive/plugins/AvantZoom/imagestopublic_html/digitalarchive/files/zoom/images
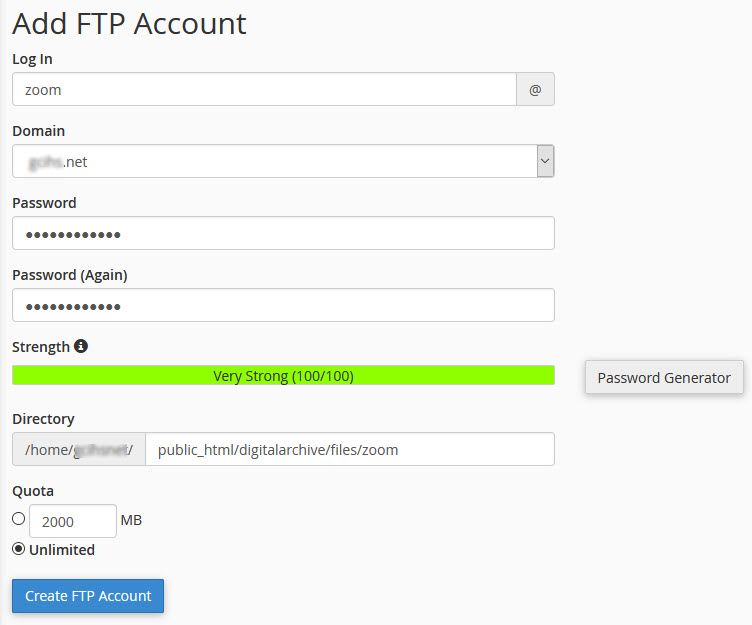
Create limited FTP account
Follow these steps to create a limited access FTP account that will allow an administrator to upload
zoomable image tiles to the zoom folder, but will prevent them from seeing any other
installation folders.
- Go to cPanel and choose
FTP Accounts - Type
zoomfor the Log in name and generate a password - Set the Directory to
public_html/digitalarchive/files/zoom - Leave the Quota as
Unlimited - Click the
Create FTP Accountbutton - The FTP username will look like this example:
zoom@mydomain.net - Test the account using the documentation for zoom tiles upload methods.
AvantS3
Skip this task if the installation will not be using S3.
Follow these steps to install and configure AvantS3:
- Go to the Omeka
Pluginspage - Click the
Installbutton forAvantS3
If you are not using the AvantCustom plugin, also follow these steps:
- Go to the configuration options page for the AvantElements plugin
- Add the code below to the end of the Custom Callback specifiers
Identifier, filter: DigitalArchive, filterIdentifierS3
AvantElasticsearch
Skip this task if the installation will not be using AvantElasticsearch.
Create AWS credentials
Before installing AvantElasticsearch, create the AWS credentials that you'll need to provide on the AvantElasticsearch configuration page.
- Go to https://aws.amazon.com/
- Click the
Sign In to the Consolebutton at upper right - Enter the Account ID ending in
4548 - If the page says Sign is as IAM user, click the
Sign-in using root user emaillink - Enter the root user email
- Enter the root user password
- Provide the Google Authenticator code
- You should now be on the AWS Management Console page
- In the top menu dropdown for the logged in user, choose
Security Credentials (root user) - You should now be on the My Security Credentials page
- Click
Usersin the left menu - Click the
Create Userbutton at the top right - For the
User nametype the organization abbreviation in lowercase e.g.swhpl - Leave the access to AWS Management Console option unchecked
- Click the
Nextbutton - In the Permissions options section, choose
Add user to group - In the User groups section, check the box for
contributorgroup - Click the
Nextbutton - Click the
Create userbutton - Click the new user in the list of users
- In the Summary section, click
Create access key - On the Access key best practices page choose
Other - Click the
Next button - On the Set description tag page click the
Create access keybutton - You should now be on the Retrieve access keys page
- Click the
Showlink for the Secret Access Key - Copy the Access Key ID and Secret Access Key to the
AWS Keystab of theDigital Archive AccountsExcel sheet
This is the only opportunity to obtain the secret key - Click the
Donebutton
Install the AvantElasticsearch plugin
Follow these steps to install and configure the AvantElasticsearch plugin:
Create a folder needed by the AvantElasticsearch plugin
- Go to cPanel and choose
File Manager - Navigate into the
filesfolder of the site folder - Create this subfolder:
files/elasticsearch
Install the AvantElasticsearch plugin
- Go to the Omeka
Pluginspage - Click the
Installbutton forAvantElasticsearch
Edit es.ini
Follow these steps to allow the installation to share its items with other Digital Archive installations via the shared AWS Elasticsearch index:
- In cPanel, edit
es.iniin the site folder - Set
shared_index_nameto the name of the shared index e.g.acadia
Shared Index
FOR ADMINISTRAOR ACCOUNT ONLY: If the account needs to be able to create a new local or shared index, add:
new_local_index_allowed = true and/or new_shared_index_allowed = true
to the es.ini file which is located in /digitalarchve (in the same root
folder as db.ini). This will cause new radio buttons to appear on the
Elasticsearch page to allow import into a new index. This is an especially
dangerous operation for a shared index because it will destroy all the data
for all sites in the shared index and therefore should only be performed
when creating a shared index that does not already exist.
Configure the AvantElasticsearch plugin
- Set Contributor Id e.g.
swhpl - Set Contributor e.g.
Southwest Harbor Public Libary - Set Host to the AWS Domain Endpoint which can be found in:
- The
AWS Keystab of theDigital Archive AccountsExcel sheet and on AWS and in Amazon OpenSearch Service > Domains > digitalarchive- Example:
search-digitalarchive-6wn********************o4q.us-east-2.es.amazonaws.com
- The
- Set Region to
us-east-2 - Set Key and Secret to the keys obtained in the step above to create AWS credentials
- Check Local Index
- Check Shared Index
Enable Elasticsearch in AvantSearch
- Go to the configuration options page for the AvantSearch plugin
- Check the Elasticsearch checkbox
AvantVocabulary
Skip this task if the installation will not be using AvantVocabulary.
Follow these steps to install and configure AvantVocabulary:
- Go to the Omeka
Pluginspage - Click the
Installbutton forAvantVocabulary - On the
Configure Pluginpage, leaveDelete Tablesunchecked - Click the
Save Changesbutton - Click
Vocabulary Editorin the left admin menu - Click the
Rebuild Common Terms tablebutton and clickOKon the confirmation dialog - Wait for the build to report that it has completed (it writes about 30,000 records)
- Click the
Rebuild Local Terms tablebutton and clickOKon the warning dialog - Wait for the build to say that it has completed and will reload the page (this will be very fast on a new installation)
Add vocabulary terms
At this stage the only vocabulary terms that will be set for the site are Places which is kind 4 in the site terms table. If you look at the table you'll see that those are the only kind of rows there.
You'll now need to add some Type and Subject terms so that the organization has something to work with.
Work Around
There is currently an issue with the AvantVocabulary plugin whereby you can't add a new term unless there is at least one term in the table.To work around this, manually add one Subject (Image, Photograph) and one Type (People) to the site terms table using MySql Workbench as shown below.
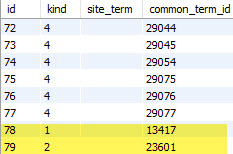
Note that to eliminate the default value of null, in the site_term column, you'll need to first add a value of one space, apply the changes, then delete the space and apply again.
Now go to the Vocabulary Editor, click the Rebuild Local Terms table button and click OK on the warning dialog.
The two terms should show and and you should now be able to add new terms.
Suggestions for an initial set of Types:
Document, Correspondence, Letter
Image, Photograph
Map
Object, Writing, Postcard
Publication, Clipping, Newspaper Clipping
Reference
Suggestions for an initial set of Subjects:
Nature, Animals
People
Places, Island
Structures, Commercial, Lodging, Hotel
Transportation, Automobile
Reindex the local Elasticsearch index
Skip this task if the installation is not using AvantElasticsearch.
- Add a new item with just the minimal fields
- If you check to see the site's search results, you'll see a
No items foundmessage and an Elasticsearch error - Click
Elasticsearchin the left menu - Export all items from Omeka
- Import into new local index
- You should now be able to see the item with no errors
Test the Elasticsearch installation
- Add a photo to the item
- Make the item public
- Test that the item appears on the other sites as shared
- Test that the new site appears on the Contributing Organizations page
Site styling
Set navigation
- Click
Appearancein the top menu bar - Click
Navigationon theAppearancepage menu bar - Uncheck
Browse Items - Uncheck
Browse Collections - In the Add a Link to the Navigation section:
- Type
landingfor the Label - For URL choose:
- For a standalone site:
https://<site-url>/digitalarchive/find?query= - For a subdomain site:
https://<site-url>/find?query=
- For a standalone site:
- Click the
Add Linkbutton - Change Select a Homepage to
landing - Leave the
landingitem unchecked
- Type
- Click the
Save Changesbutton
Test that the landing page works by clicking the site's name located at left in the admin header. Unless you've added items to the site, you'll get a No items found error which is okay. Change the Search dropdown at the bottom to All Sites to verify that results come up from other sites.
- Edit the
AboutSimple Page to add some information about the organization - Add any other menu items
Logo and styling
- Create a logo JPEG image approximately 500px X 110px
- Login to Omeka as a super user
- Click
Appearancein the top menu bar - Click the
Configure Themebutton for AvantTheme - For Logo File browse to the folder containing the logo file
- Choose the logo file
- Configure:
- Set the CSS file name
- Enter the footer text
- Adjust the custom CSS as necessary.
- Click the
Save Changesbutton - Remove the CSS files for other organization’s theme customization e.g. swhpl.css
Subdomain installation
This section discusses installing the Digital Archive in public_html/digitalarchive versus installing it in a subdomain.
A subdomain is a domain that is part of a larger domain. For example, west.example.com and east.example.com
are subdomains of the example.com domain. Note that example.com is actually a subdomain of the top-level domain com.
Subdomains are different from folders. For instance,
example.com/digitalarchive points to the digitalarchive folder within the example.com domain whereas
digitalarchive.example.com is a subdomain of example.com.
Two cases
There are two cases to consider when installing the Digital Archive in a subdomain.
- The subdomain is hosted on the domain's web server
- The subdomain is hosted on a different web server
Case 1 - subdomain is hosted on the domain's web server
Examples:
    site1.avantlogic.net
    site2.avantlogic.net
This case applies when using subdomains for hosting multiple instances of the Digital Archive on the same web server for development and testing purposes. The following sections point out some things you should be aware of.
Learn how to create a subdomain.
Database name and user
When you install the Digital Archive in more than one subdomain on the same web server, the corresponding databases and user names will all share the same prefix that cPanel assigns automatically. As such, you'll need to use unique suffixes to indicate which installation a database belongs to.
For example, on the avantlogic web server where the prefix is avantlog, instead of
following the recommendation to name the database avantlog_omeka, choose database
names like avantlog_site1 and avantlog_site2.
Similarly, for the database user name, instead of following the recommendation to name
the user avantlog_archivist, choose user names that match the database names such as
avantlog_site1 and avantlog_site2.
FTP
You don't need to set up separate FTP connections for each subdomain. You access a subdomain's files via the domain's FTP connection. If for some reason you need a separate FTP connection for a subdomain, the connection cannot use the SSH protocol, but must instead use the FTP protocol. For related documentation on this see Filezilla FTP settings for uploading zoomable images.
Case 2 - subdomain is hosted on a different web server
Example:
digitalarchive.somecollege.edu
In the example, the Digital Archive files are installed in the public_html folder on a web server
that is different from the somecollege.edu web server. On that different web server, the files are
installed in public_html instead of in a digitalarchive folder because if they were, the URL
would need to be digitalarchive.somecollege.edu/digitalarchive which is redundant.
To make this work, that is, for the subdomain ending in edu to resolve to another server,
the somecollege.edu web administrator must point an A record or CNAME for the subdomain to the
web server that hosts the subdomain. (CNAME is recommended as future-proof against server migrations).
With this arrangement, you can perform the tasks to install a Digital Archive site
with only one modification: Instead of installing into the digitalarchive folder, install into the
public_html folder.
Because you will be installing into the public_html folder, the code to force HTTPS for all pages
needs to go into the .htaccess file that ships with Omeka in its top-level folder. Add the
code below near the top of the file after RewriteEngine on. Don't add code for redirecting root access.
    # Force all URLs to HTTPS
    RewriteCond %{HTTPS} off
    RewriteRule (.*) https://%{HTTP_HOST}%{REQUEST_URI} [R,L]
Installing on a bare Linux server
This section provides a few tips for installing on a remote server that does not have cPanel.
First, see Linux server administration and pay particular attention to the places that provide information on how to perform operations using the command line and ignore the places that refer to WHM and cPanel.
SSH
You can perform command line operations using OpenSSH that is built into Windows 10 and 11. To connect to the remote server using SSH:
- Open a Windows terminal window (Command Prompt)
- Type
sshfollowed by the host name of the remote server - Enter the password (does not show anything as you type)
    C:\Users\username>ssh foo.bar.net
    username@foo.bar.net's password:
    Last login: Wed Mar  6 07:30:19 2024 from 74.75.232.104
    [username@foo ~]$
You can now type Linux commands the same as you would using a cPanel Terminal window.
Troubleshooting
404 error when trying to go to any Omeka page
This problem can occur if mod_rewrite is not installed. See 404 and Not Found
in the Omeka Classic User Manual.
The problem could also occur if the .htaccess file is not getting executed. One reason this could happen is if you leave the . off the
beginning of the file name. You could try introducing an error into the file to determine if it is being executed.
Destination directory is not writable error
You'll get this permissions error when you attempt to add an item with a file attachment.
See Setting Directory Permissions in the Omeka Classic User Manual.
The problem occurs if the web server process doesn't have write access to the files directory and everything under it.
The solution will depend on your server, but assuming that the web server runs as user apache you could do chown -R apache on the files directory to get the result below.
[username@foo digitalarchive.bar.org]$ ls -l files
total 1180
drwxrwsr-x. 125 apache digarc    4096 Mar  6 13:12 fullsize
drwxrwsr-x.   2 apache digarc 1130496 Mar  6 13:02 import
drwxrwsr-x. 125 apache digarc    4096 Mar  6 13:12 original
drwxrwsr-x. 125 apache digarc    4096 Mar  6 13:12 square_thumbnails
drwxrwsr-x.   2 apache digarc      68 Mar  5 11:30 theme_uploads
drwxrwsr-x. 125 apache digarc    4096 Mar  6 13:12 thumbnails