Digital Archive site maintenance
Editing files
The site maintenance files are located in the bin and bin/python directories in the daus account.
Use one of these methods to edit site maintenance files:
-
cPanel File Manager
- Open cPanel for the
digitalarchive.usaccount - Run File Manager
- Navigate to the
binfolder/home/daus/binwhich contains scripts, python, and data files
- Open cPanel for the
-
nano <file-name>e.g.nano digital-archive-sites.csv- Perform edits
^Xto exitYto save changes- Press
Enterto write to the same file
Add a new site
To enable site maintenance for a new Digital Archive site:
- Log in into
digitalarchive.us - Add the site's organization ID to the site list:
- Edit
bin/python/digital-archive-sites.csvto add the site ID
- Edit
- Add the site's cPanel user name to the sync script:
- Edit
bin/sync-digitalarchiveto add the user name
- Edit
After you add a new site and then run sync-digitalarchive, all of the site's files will get updated because they are syncing with the master copies which have different timestamps than the ones uploaded as part of the manual site installation process.
Software updates
After making changes to Digital Archive plugins, or after upgrading to a new release of Omeka, you have to update the Digital Archive sites. There are two steps:
- Sync the local and master files
- Push the master files to the site(s) to be updated
Sync local and master files
The master files for a Digital Archive installation are located on the digitalarchive.us (daus) server in the digitalarchive directory which is not publically accessible.
To update the master files with the local development files:
- Run Beyond Compare
- Run one of these sessions:
DAUS\DAUS PLUGINS and THEMES(use if only plugin or theme files were updated)DAUS\DAUS ALL FILES(use after doing an Omeka upgrade)
- Mirror Right local
C:\laragon\www\omekatopublic_html/digitalarchive-masteron the daus server
Important: Be sure to MIRROR, not copy the files.
Push updates to one site or all sites
You can very quickly push only the updated master files to one or all Digital Archive sites from the daus command line.
Login
- Login to InMotion WHM as root
- Choose List Accounts
- Click the cPanel icon for
digitalarchive.us - Choose Terminal
- Navigate to
/home/daus/bin.
Update only plugins and themes
To update just the plugins and themes folders, choose one of the commands below. The first command has no
parameter and will display all of the valid site names.
$ ./sync-digitalarchive
$ ./sync-digitalarchive <cpanel-user-name>
$ ./sync-digitalarchive ALL
Example to update only the abc site:
$ ./sync-digitalarchive abc
- When prompted, type the password for user
daus - Then type an option:
yto perform a dry runYto perform the syncnor any other character to exit
- Press
Enter
To be cautious, first do a dry run to see what files will be updated. Then do the actual sync followed by another dry run to see that no files need updating.
The script will sync these folders:
themes/
plugins/
If an updated plugin's version number changed, you will need to manually go to each site's plugins page to upgrade the plugin. If you don't do this, the plugin won't work which will probably break the site. A common occurrence of this is an Omeka update to the Simple Pages plugin.
Update all installation files
To update all installation files and folders, choose one of these commands:
$ ./sync-digitalarchive <cpanel-user-name> installation
$ ./sync-digitalarchive ALL installation
With the installation argument, the script will sync these files and folders:
themes/
plugins/
application/
install/
admin/
es.ini
bootstrap.php
index.php
error_log (copies an empty log to the site)
The output from a sync operation is written to bin/logs/sync-HH-MM-SS.log
Site requests
From the command line you can send requests to one or all Digital Archive sites. A pyhon script sends the request to a site via HTTP and the site responds to indicate whether and how it handled the request.
From the daus command line choose one of these commands:
remote-request <request> <site-id>
remote-request <request> ALL
Examples of request to a site having ID abc:
[daus@avantlogic bin]$ remote-request ping abc
[daus@avantlogic bin]$ remote-request es-health-check abc
The supported requests are:
ping
garbage-collection
es-health-check
vocab-update
vocab-rebuild
The output from site request operations is appended to bin/logs/requests.log
Upgrade to new Omeka release
This section explains how to upgrade the Digital Archive's Omeka core files to a new release of Omeka. Updating involves copying Omeka core files from the release to the site folder. Since the Digital Archive does not modify any Omeka core files, these is no need to review changes to those files. Read all of these instructions before proceeding. The steps should take about a half hour.
Download the new release
- View the new release of Omeka Classic on omeka.org.
- Download the latest release from the releases page on GitHub.
- The release file will have a name like
omeka-3.0.1.zip.
- The release file will have a name like
- Put the zip file on the desktop or other folder that is not deeply nested. In a deeply nested folder, some files will get an unzip error because their resulting file path is too long.
- Unzip the release into a work folder named as the release e.g.
omeka-3.0.1. - Delete the zip file.
- Move the work folder to
Digital Archive AvantLogic\Omeka\Omeka Downloads\Omeka Releases.
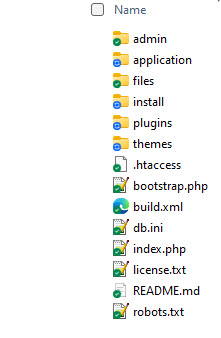
Make sure the folder contains the release files as shown below, not a single folder containing the release files as sometimes happen when you unzip a file from GitHub.
Update the local development site
Before proceeding, run Omeka on the development site to verify it runs properly with the current release. There should be no issues, but if, for example, something in the environment changed that created a problem, find and fix it first so you won't think it's related to the new release.
- Make a temporary backup copy of the current release folder
laragon\www\omeka:- Create an empty backup folder on the desktop named
omeka-backup. - Open the
laragon\www\omekafolder. - Select all the folders and files except for the
filesfolder which is huge. - Copy the selected items to the backup folder (takes about a minute).
- Create an empty backup folder on the desktop named
- Use Beyond Compare to compare the current and new release folders:
- Run Beyond Compare.
- Edit the
DAUS > omeak-3.x <--> laragon\www\omekasession. - Change the source to the folder containing the new release.
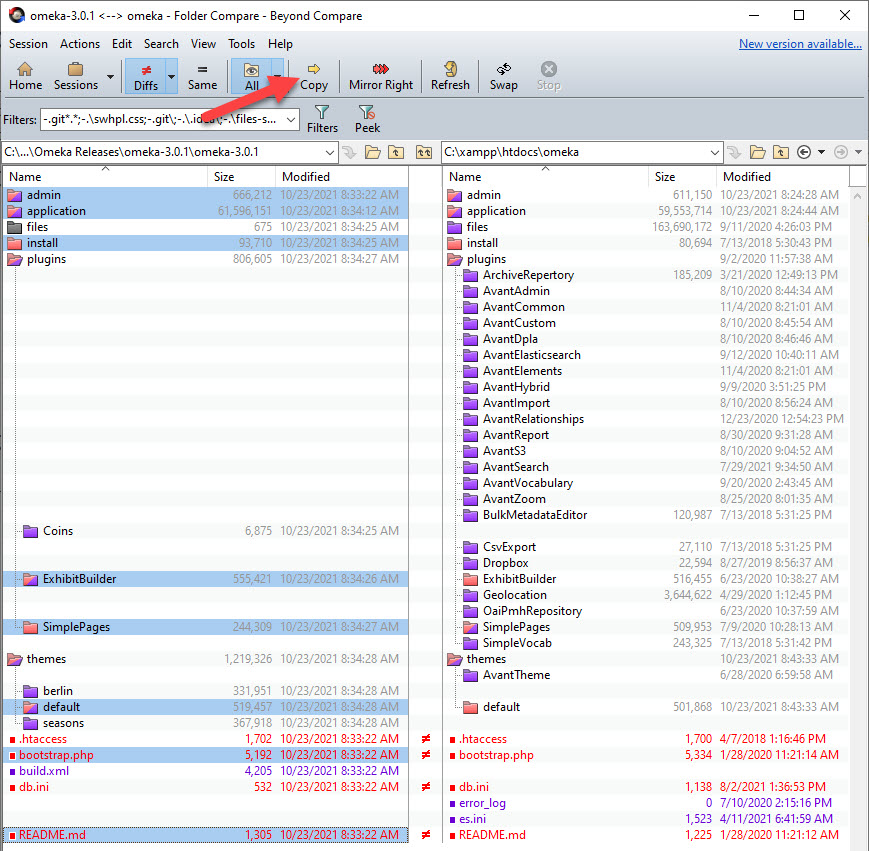
Use Beyond Compare to Copy (do not Mirror) the following core files to C:\laragon\www\omeka:
admin
application
install
plugins/ExhibitBuilder
plugins/SimplePages
themes/default
bootstrap.php
README.md
Do not copy any folders or files that are not listed above. If a folder or file has not changed, you don't need to copy it. Ctrl-click folders and files to select the ones to be copied as shown below.
ImageMagick and Windows
If you are updating Omeka on the Windows development server:
- Edit
\omeka\application\libraries\Omeka\File\Derivative\Strategy\ExternalImageMagick.php - Define the ImageMagick constant as:
const IMAGEMAGICK_CONVERT_COMMAND = 'magick.exe'; - This ensures that ImageMagick Directory Path on the Omeka Settings page works for the Windows ImageMagick executable
magick.exe. - IMPORTANT: On Linux,you must leave the constant defined as
convert.
For a Windows installation set the ImageMagick Directory Path to
C:\Program Files\ImageMagick-7.1.0-Q16-HDRI (or whatever version is installed).
The Beyond Compare session DAUS_ALL_FILES excludes ExternalImageMagick.php so that the edited version won't get mirrored
to the server. However, if the Omeka upgrade changed the file, you'll need to manually copy it to the server without
the change to the IMAGEMAGICK_CONVERT_COMMAND constant since it needs to be convert on the server.
Verify that the new release works properly
Normally the site should just come up, though on releases of Omeka prior to 3.0 you were presented with a dialog to update the database. It appears that 3.0 updates the database automatically.
Verify that the new release is installed by going to the Dashboard page and looking at the Omeka version in the lower right corner.
When you are comfortable that the upgrade is okay, you can delete the temporary backup folder created earlier.
See the Software updates section for how to deploy the upgrade to all Digital Archive installations.
Troubleshooting
Past updates of release Omeka 2 have always gone smoothly, but 3.0 presented problems. When it first came up it reported a Zend_Controller_Exception and then an InvalidArgumentException. The errors appeared to be triggered by a plugin and by AvantTheme, though later there were no issues with either, so it probably had to do with the interim transition from the old to the new release. The solution was to back out the new release, and with the older version running, deactivate all of the Avant plugins and switch from AvantTheme to the default Omeka theme. After updating the site again with the new release, the errors went away and none reoccurred after switching back to AvantTheme and activating the Avant plugins.
Common vocabulary updates
To update the common vocabulary on one or all Digital Archive sites:
- Make updates to one or more of the following files:
input-translations.csvinput-additional-terms.csvinput-nomenclature-sortEn_2020-05-18.csv(replace with latest version from Nomenclature)
- Run
build_common_facets.py. The script:- Creates these files:
digital-archive-vocabulary.csvdigital-archive-diff.csv
- Uploads the two files to:
digitalarchive.us/public_html/vocabularyvia FTP
- Creates these files:
- Test the changes locally and build again until satisifed
- When done making changes:
- Delete local file
input-previous-digital-archive-vocabulary.csv - Rename local file
digital-archive-vocabulary.csvtoinput-previous-digital-archive-vocabulary.csv
- Delete local file
- Verify that
digital-archive-diff.csvwas FTPed todigitalarchive.us/public_html/vocabulary - Make a
vocab-updatesite request for one site or all sites (see example below)
Example update request:
[daus@avantlogic bin]$ remote-request  vocab-update nehl
Request 'vocab-update' to  nehl'? (y/n) y
Post "vocab-update" request to  nehl"
2021-10-24 20:49:00.781881 Request:[vocab-update > nehl]
Response: nehl] Commands processed: 23. Items refreshed: 3
In the example above, the site reported back that it processed 23 commands (ADD, UPDATE, or DELETE) and updated 3 items as a result. In this particular case, there were 22 ADD commands and 1 UPDATE command. Since no items could be using the newly added vocabulary terms, none could be affected, but 3 items were using the term that was updated.
If you make the exact same request second time, the same number of commands will be processed, but no items will be affected.
A developer can simulate a remote vocabulary update locally via the query string:
http://localhost/omeka/avant/remote?action=vocab-update&password=ABC123
Nightly cron job
Every night a Linux cron job runs a python script to send these requests to each site:
garbage-collectiones-health-check
You can manually run the cron job like this:
[daus@avantlogic bin]$ ./nightly-cron-job
The garbage collection request tells the site to clean out its sessions table to remove old records, many of which are for visits from bots and crawlers.
The health check requests tells the site to compare its Elasticsearch document count to its MySQL records count to verify that they are the same. If the check fails, the script sends email to the Digital Archive administrator as shown in the example below.
FAIL: SQL:3077 Index:3075 Missing:3054,3080
Normally the health check will never fail, but if it does, the email will indicate which MySQL records are missing from the Elasticsearch index. In the message above, the numbers 3054 and 3080 are Omeka item Ids, not Digital Archive item identifiers. To correct the problem, first locate a missing item in the Digital Archive using a URL like the one below.
https://yourdomain.net/admin/avant/show/3054
Edit the item by making a minor change to a field (e.g. add a blank space to the end of a sentence), and then save the item. This will cause the item to get re-synced with the Elasticsearch index. Run the health check again to see if the problem has been fixed.
Running scripts
Root privileges
A user with root privileges can run bash scripts that modify files on every Digital Archive installation on the server.
To assign a user root privileges via sudo:
- Go to WHM and choose Manage Wheel Group Users
- Add a user to the wheel group
A user in the wheel group can use the system's su and sudo utilities.
Making a script executable
Use the chmod command to make a script file executable. For example, you can make file foo executable with this command:
chmod +x foo
To execute the foo script type:
./foo
If a script requires root privileges, use sudo to run it. For example:
sudo ./foo
To add a job:
crontab -e
See crontab.guru.
Increase max execution time
For long running foreground jobs like a reindex, you need to make sure that the PHP max_execution_time is high enough to let the job complete. The default of 30 seconds is usually too low.
- Go to cPanel
- In the Software section choose “Select PHP Version”
- Click “Switch to PHP Options” at upper right
- Click the value of max_execution_time.
- Enter a new value, click Apply
- Click Save
Reset a MySQL table's Auto Increment
See: https://viralpatel.net/blogs/reseting-mysql-autoincrement-column/
ALTER TABLE table_name AUTO_INCREMENT = n;
where n will be the id for the next record created.
Backup and restore database
Restore
- Login to InMotion WHM as root
- Choose List Accounts
- Click the cPanel icon for
digitalarchive.us - Choose Backup Manager tool
- In the Backup Type section expand MySQL
- Choose the restore options and click the Restore button