MapsAlive
The MapsAlive plugin lets you display your Omeka content (metadata and images) on an interactive map that was created with MapsAlive. MapsAlive is a web application that lets you create interactive maps and diagrams that you can insert into web pages like this one. The plugin works with the MapsAlive free trial, and with the Plus or Pro Plan.
Try it now with the map below. Click or touch the building shape markers, pan and zoom the map, and select locations from the menu. The text and pictures you see are being requested in real time by the plugin from the Southwest Harbor Public Library's Omeka site.
Maps that use this plugin
Here are interactive maps that use this plugin. They will give you ideas for how you can use an interactive map with your own Omeka items.
How it works
The MapsAlive plugin lets your Omeka site act as a MapsAlive Live Data server. An interactive map makes requests to the server and the server responds with information from your Omeka items.
It works like this:
- A user selects a hotspot on your interactive map by mousing over, clicking, or touching it.
- The map asks the MapsAlive plugin to get data, such as image URLs and text, for that hotspot.
- The plugin gets the data from items in your Omeka database.
- The plugin inserts the data into an HTML template that you define.
- The plugin sends the HTML back to the map.
- The map displays the information about the hotspot the user selected.
Getting started
Here are the steps for creating an interactive map that displays information from your Omeka items. If you are familiar with using MapsAlive, these steps should take about five minutes.
- 1 – Add the MapsAlive plugin to your Omeka installation
-
If the plugin is not already installed, follow these steps:
- Downloaded the plugin from the Omeka Classic plugins page or from GitHub.
- Follow the steps in the installation section.
- On your Omeka installation's Plugin page, locate the MapsAlive plugin.
- Click on the Configure button. If the Install button is showing instead of the Configure button, click the Install button to activate the plugin. Both buttons will take you to the plugin's configuration page.
- 2 – Define a template
-
On the MapsAlive plugin's configuration page, define a template. The screenshot below shows a template that creates HTML for an Omeka item's title, photo, and a "View this item" link.
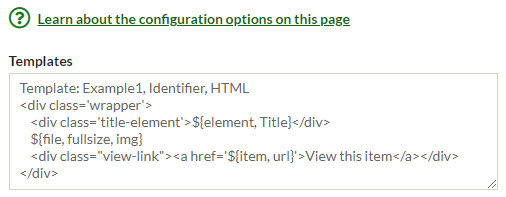
For convenience, here is a template that you can copy/paste into the Templates field.
Template: Example1, Identifier, HTML
<div class='wrapper'>
    <div class='title-element'>${element, Title}</div>
    ${file, fullsize, img}
    <div class="view-link"><a href='${item, url}'>View this item</a></div>
</div>
- 3 – Create a MapsAlive tour
-
In MapsAlive, create a new MapsAlive tour.
- Use a map image that shows locations of items in your Omeka database.
- Create a few hotspots and place them on the map at locations of interest.
- Don't upload images for the hotspots or type any text for them.
If using MapsAlive's step-by-step instructions to create a new tour:
- After you choose a map image:
- Ignore the instructions for adding hotspots and uploading an image.
- Instead, just click the Add New Hotspot icon two times to add two hotspots.
- Then click the Map Editor icon.
- Resume following the instructions on the Map Editor screen.
- 4 – Add a request function to the tour
-
In MapsAlive, add a request function that will call the MapsAlive plugin.
- Choose Tour > Custom HTML from the Tour Builder menu.
- On the Custom HTML screen, type the function shown below into the JavaScript field.
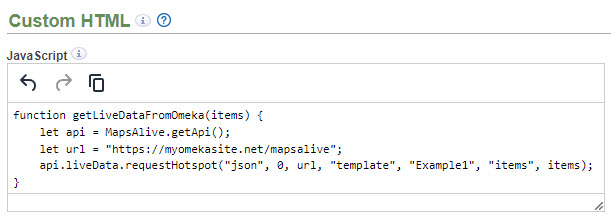
- Change
Example1to be the name of the template you defined in step 2 above. - Change
myomekasite.netto be your Omeka site. Leave/mapsaliveat the end of the URL.
For convenience, here is a function that you can copy/paste into the JavaScript field.
function getLiveDataFromOmeka(items) {
let api = MapsAlive.getApi()
let url = "https://myomekasite.net/mapsalive";
api.liveData.requestHotspot("json", 0, url, "template", "Example1", "items", items);
}
- 5 – Make the hotspots call the request function
-
When a user mouses over, clicks, or touches a hotspot, the hotspot will call the request function which will call the MapsAlive plugin. The plugin will return the Omeka item metadata and image URLs for that hotspot and insert them into the HTML defined in your template.
- Choose Hotspot > Advanced Hotspot Options from the Tour Builder menu.
-
Find the Live Data Options section on the MapsAlive Advanced Hotspot Options screen.
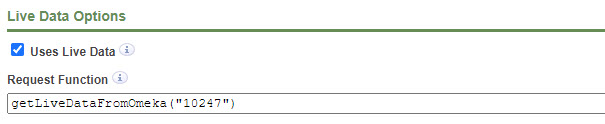
For each hotspot:
- Check the Uses Live Data option.
- Type a call to the request function as shown in the screenshot above.
- Change
10247to be the Omeka item identifier for that hotspot.
For convenience, here is a call that you can copy/paste into the Request Function field.
getLiveDataFromOmeka("10247")
- 6 – Try out your interactive map
-
- View your map on the MapsAlive Tour Preview screen.
- Mouse over, click, or touch the hotspots to see them display your Omeka item data.
- Learn about using CSS to style the information displayed by your template.
- 7 – Troubleshooting
-
Here are common problems you may encounter when you view the hotspots on your map.
- "Live Data request failed" will display if the URL you specified in step 4 above is not correct. The URL must be the address of your Omeka site with
/mapsalveat the end. To determine if the URL is correct, paste it into the address bar of your browser. A correct URL will display the message shown below which means that the plugin got called, but with no arguments. If you see any other result, the URL is not correct.
- "Live Data request failed" will display if the URL you specified in step 4 above is not correct. The URL must be the address of your Omeka site with
{ "error": "No item identifier(s) provided" }-
- The hotspot displays an unwanted image that you uploaded to MapsAlive, followed by the images and data from your Omeka site. To remove the unwanted image:
- Go to MapsAlive
- Choose Hotspot > Edit Hotspot Content from the Tour Builder menu
- In the Photo section, click the Remove Photo link that appears next to the thumbnail
- If the image and text from your Omeka site display, but the appearance is very plain, you'll need to add some styling using CSS.
- The hotspot displays an unwanted image that you uploaded to MapsAlive, followed by the images and data from your Omeka site. To remove the unwanted image:
-
If the problem you are having is not listed above, please contact support@mapsalive.com.
-
For more information, see the section on using the plugin with a MapsAlive map.
Configuration options
The MapsAlive plugin has only one configuration field called Templates. You use the field to define one or more templates that contain HTML or JSON that the plugin will use when it responds to a Live Data request from the map.
Below is a screenshot showing the configuration page. The parts of the template text that are enclosed inside ${...} and highlighted in yellow are specifiers indicating where information from Omeka items will be inserted into the template when the map makes a Live Data request.
Templates
Templates specify the form and appearance of the information that the plugin returns in response to a Live Data request from a MapsAlive interactive map. The first line of the template specifies its name and other information. The remaining lines are the template's HTML or JSON.
Syntax:
"Template:" <template-name> “,” <item-identifier> “,” <format>
Where:
| Option | Description |
|---|---|
| <template‑name> | A name you choose for the template. Each template must have a unique name and only letters, digits, and _ are allowed. Template names are case-sensitive. |
| item‑identifier | The name of the Omeka element to be used as the unique identifier for the Omeka items that will provide information for the template. Typically it will be the Identifier element, but you can use any element, such as Catalog # that uniquely identifies items.If more than one item has the same identifier, the plugin will only get information for one of the items. To use the Omeka item Id as the identifier, specify omeka_id. |
| format | Either HTML or JSON to describe the contents of the template. Typically you will write templates as HTML, but you can write them in JSON if you want to let the map's JavaScript process and format the data. Use of JSON templates is discussed later on. |
Below is an example of a template followed by an example of what the resulting Live Data response might look like. If you compare the two, you'll see that the response is the template, where each specifier in the template has been filled in with information from an Omeka item.
Template
Template: Example1, Identifier, HTML
<div class='wrapper'>
    <div class='title-element'>${element, Title}</div>
    ${file, fullsize, img}
    <div><a href='${item, url}'>View this item</a></div>
</div>
Live Data response
<div class='wrapper'>
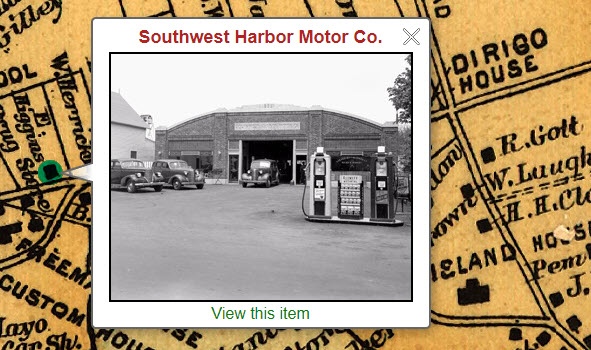
<div class='title-element'>Southwest Harbor Motor Co.</div>
<img href='https://myomekasite.net/files/thumbnails/10247.jpg' width='300' height='246>
<div><a href='https://myomekasite.net/items/show/6861>View this item</a></div>
</div>
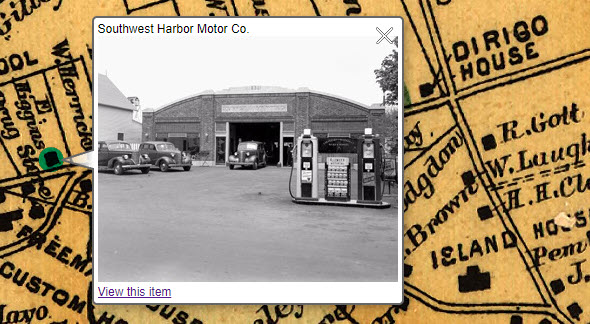
The screenshot below shows what the information from the Omeka item might look like when displayed on a map inside a popup that has been styled using CSS.
Specifiers
A template can contain one or more specifiers that indicate what kind of Omeka item information should be inserted into the template when the map makes a Live Data call.
There are four kinds of specifiers:
The syntax for a specifier is:
"${" <specifier-kind> [ <options> ] "}"
The closing curly brace must be on the same line as the opening curly brace.
Specifier options are described later for each kind of specifier.
Specifier item index
A specifier can include an item index option to indicate which of multiple items the specifier is for. If you don't provide the item index, it defaults to 1 meaning the first or only item.
To better understand what the item index is for, suppose you have two items about a building. The first item has a photo, but no other information. The second has a description of the building plus another photo. You could use the template below to display the description from the second item and the images from both items.
Template: Example2, Identifier, HTML
<div>${element, Description, 2}</div>
<div>${file, img, 1}</div>
<div>${file, img, 2}</div>
How a hotspot passes item identifiers to the plugin
A map hotspot passes item identifiers to the plugin in a comma-separated list. In the example below, the hotspot is passing "1001,1002" to provide the identifiers for items 1001 and 1002.
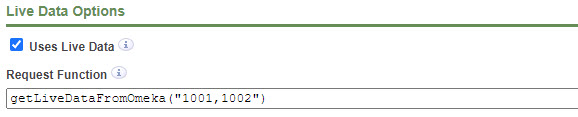
The example above uses integers as item identifiers, but you can use other values. For example, if your template specified Catalog # instead of Identifer, your map might pass "81.1.93,96.2.1" to provide the identifiers for items having catalog numbers 81.1.93 and 96.2.1.
Bad identifier warning
If your map passes a bad identifier value, that is, a value that doesn't match any of your published Omeka items, the plugin will insert warning text like this: "[ITEM 1022 NOT FOUND]". To prevent the plugin from inserting this warning, see the warnings argument in the MapsAlive plugin arguments section.
Element specifier
The element specifier requests the value of a metadata element for an Omeka item.
Syntax:
“${element”, <element-name> [ “,” <item-index> ] “}”
Where:
| Option | Description |
|---|---|
| <element‑name> | The name of an Omeka element. |
| <item‑index> | An optional item index explained in the specifier item index section above. |
Examples:
${element, Title}
${element, Description, 2}
Unpublished items and private elements
The element specifier only shows a value for published items. It shows a bad identifier warning for items that have not been published. For a published item, it will return a value for any element including ones you have made private or hidden using a plugin like AvantCommon or HideElements. So be careful not to include an element specifier for an element that you do not want the public to see.
File specifier
The file specifier requests information about a file, usually an image, attached to an Omeka item.
Syntax:
“${file”, <derivative-size>, <property> [ “,” <item-index> ] [ “,” <file-index> ] “}”
Where:
| Option | Description |
|---|---|
| <derivative‑size> | One of these sizes: thumbnail, fullsize, or original.Derivative is an Omeka term that refers to the various sizes of images that Omeka derives from the original image uploaded to an item. |
| <property> | One of these file properties: img, url, width, or height.These properties are explained in the file specifier properties section below. |
| <item‑index> | An optional item index explained in the specifier item index section above. |
| <file‑index> | An optional file index to indicate which of the item's files the request is for. If the option is omitted, the default is 1 meaning the first (or only) file attached to the item. In the examples below, the last three lines are using a file index to request images for the first, second, and third files of the first item. |
Examples:
${file, fullsize, img}
${file, original, url, 2}
${file, thumbnail, img, 1, 1}
${file, thumbnail, img, 1, 2}
${file, thumbnail, img, 1, 3}
File specifier properties
There are four file specifier properties, but usually, you will only use the img property.
| Option | Description |
|---|---|
| url | The location of the file on the Omeka website. |
| width | The width of an image file in pixels. |
| height | The height of an image file in pixels. |
| img | This is a special convenience feature that creates a fully-formed <img> tag for the image. It is explained in the next section. |
img property
The img property saves you from having to code an <img> tag and it ensures that the tag has the correct attributes and styling to:
- Tell the browser the image's dimensions to prevent the image from initially appearing too small and then resizing after the browser has downloaded it and determined its dimensions.
- Adjust the image's size to fit a container that is narrower and/or shorter than the image's width and height. This is done by setting the image width to scale to 100% of its container width and letting the browser calculate the scaled height.
- Prevent extra white space that can appear below an image due to the way browsers render inline images. The problem is fixed by setting the
vertical-alignstyle.
This is how you use the img property:
${file, fullsize, img}
Here is an example showing the <img> tag that gets created for you.
<img src='https://myomekasite.net/files/thumbnails/10247' width='300' height='246'
   style='max-width:100%; height:auto; vertical-align:middle;'>
If the item does not have the request image, the property will produce a bad identifier warning, or nothing at all if warnings are turned off.
If you choose to code the <img> tag yourself, be sure to take the above into consideration.
Item specifier
The item specifier requests the URL or the Omeka Id for an Omeka item. Note that the Omeka Id for an item is not necessarily the same as the value of the item's Identifier element.
Syntax:
“${item”, <property> [ “,” <item-index> ] “}”
Where:
| Option | Description |
|---|---|
| <property> | One of these item properties: url or id.The URL is the one used to display the item on an Omeka site. The Id is the number that Omeka uses to identify the item in the Omeka database. |
| <item‑index> | An optional item index explained in the specifier item index section above. |
Example:
The example below shows a template that uses both kinds of item specifier properties.
Template: Example3, Identifier, HTML
<div>${item, id}</div>
<a href="${item, url}">View this item</a>
The HTML below shows what the template would produce for an Omeka item having Id 102.
<div>102</div>
<a href="https://myomekasite.net/items/show/102">View this item</a>
Data specifier
The data specifier gets a data value that was passed from the map and inserts it into the template. It is useful when you want the map to display information that is not available from an Omeka item. For example, you might have Omeka items with photos of a location on the map, but none on the items have a metadata element that says what the location is. The Live Data call for the hotspot at that location on the map could pass the name of the location.
Syntax:
“${data” [ “,” <data-index> ] “}”
Where:
| Option | Description |
|---|---|
| <data‑index> | An optional data index to indicate which data value the request is for. If the option is omitted, the default is 1 meaning the first (or only) data value. |
Example:
Template: Example4, Identifier, HTML
<div>${data}</div>
<div>${data, 2}</div>
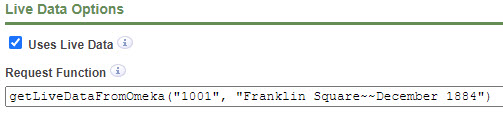
How a hotspot passes data values to the plugin
A map hotspot passes data values to the plugin in a double-tilde-separated list. In the example below, the hotspot is passing the item identifier 1001 and the text "Franklin Square~~December 1884" to provide the two data values Franklin Square and December 1884.
function getLiveDataFromOmeka(items, data) {
   let api = MapsAlive.getApi();
   let url = "https://myomekasite.net/mapsalive";
   api.liveData.requestHotspot("json", 0, url, "items", items, "template", "demo", "data", data);
}
A convenient way to provide data for individual hotspots is to store the data values as the hotspot's content using the text editor on the MapsAlive Edit Hotspot Content screen. For example, you could type "Franklin Square~~December 1884" as the hotspot's content. To pass the content to the MapsAlive plugin for use by a data specifier, code your request function to pass the content in the data argument like this:
function getLiveDataFromOmeka(items) {
   let api = MapsAlive.getApi();
   let url = "https://myomekasite.net/mapsalive";
   let data = api.currentHotspot.plainText;
   api.liveData.requestHotspot("json", 0, url, "items", items, "template", "demo", "data", data);
}
Repeat section
A template can contain one repeat section to emit the same HTML or JSON repeatedly for a list of items passed to the plugin.
To explain the power of a repeat section, let's first describe a scenario that does not use this feature. Suppose you have four items where the first item has title text identifying a location and the other three items have photos of the location. A map could show the text and three images by using the template below and passing four item identifiers.
Template: Example5, Identifier, HTML
<div >${element Title, 1}</div>
<div>${file, fullsize, img, 2}</div>
<div>${file ,fullsize, img, 3}</div>
<div>${file, fullsize, img, 4}</div>
The template above works well if each hotspot on your map has three photos associated with it; however, by using a repeat section, you can create a template like the one below that does the same thing as the template above, but will work with any number of photos including zero.
Template: Example6, Identifier, HTML
<div>${element, Title}</div>
[--
<div>${file, fullsize, img}</div>
--]
As shown in the example above, the repeat section is delimited by lines containing [-- and --]. The delimiters must be on their own line with no other text before or after them. The repeat section can contain one or more rows.
Using a repeat section
To use a template that contains a repeat section, the map makes a Live Data call passing two sets of item identifiers as explained in the Live Data call section below. The first set is used for the specifiers that are outside of (above or below) the repeat section, and the second set is used for specifiers within the repeat section.
The one restriction when using a repeat section is that specifiers in the rows within the repeat section cannot use a specifier item index. That's because each row in a repeat section gets its data from just one of the items in the second set of items that the map passes as was just explained.
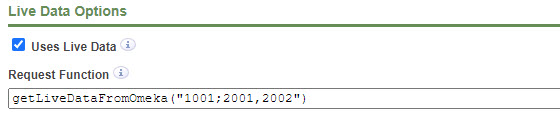
How a hotspot passes identifiers for repeating items to the plugin
A map hotspot passes identifiers for both the non-repeating and repeating items together in a semicolon-separated list. In the example below, the hotspot is passing "1001;2001,2002" to provide the non-repeating identifier 1001 and two repeating identifiers 2001 and 2002. If you only want to pass repeating items, code 0 before the semicolon like this: "0;2001,2002"
The resulting HTML when using template Example6 above might look like this:
<div>Franklin Square</div>
<img href='https://myomekasite.net/files/thumbnails/franklin_sq.jpg' width='300' height='246'>
<img href='https://myomekasite.net/files/thumbnails/98762.jpg' width='300' height='300'>
Using the plugin with a MapsAlive map
The getting started section at the beginning of this documentation explains what you need to do to create an interactive map that displays information from your Omeka items. This section provides some additional information, but to fully understand how it all works, read the MapsAlive documentation for using its Live Data feature to request hotspot content.
Request function
The request function is what connects your interactive map with this plugin. When a user mouses over, clicks, or touches a hotspot, the hotspot will call the request function which will call the MapsAlive plugin. The plugin will return the Omeka item information for that hotspot as the HTML defined in your template.
A request function is a JavaScript function that you code on the MapsAlive Custom HTML screen in the JavaScript field. A typical request function is shown below. In this example the function is named getLiveDataFromOmeka but you can call it anything you like.
function getLiveDataFromOmeka(items) {
   let api = MapsAlive.getApi();
   let url = "https://myomekasite.net/mapsalive";
   api.liveData.requestHotspot("json", 0, url, "template", "mytemplate", "items", items, "data", "");
}
MapsAlive plugin arguments
The table below explains the arguments passed to the requestHotspot API method when it is used to call the MapsAlive plugin.
| Argument | Description |
|---|---|
| "json" | Tells MapsAlive that the response will come back from the MapsAlive plugin as JSON. Always specify "json" regardless of whether your template uses HTML or JSON format. |
| 0 | Tells MapsAlive to only request the data once and cache the response so that it does not call the MapsAlive plugin more than once for the same hotspot. |
| url | The root URL of your Omeka site with /mapsalive at the end. Adding /mapsalive to the URL is what causes the MapsAlive plugin to be called. |
| template | Tells the plugin which template to use. Template names are case-sensitive. |
| items | Passes a comma-separated list of item identifiers to the plugin. See how a hotspot passes item identifiers to the plugin. Also see how a hotspot passes identifiers for repeating items to the plugin |
| data | Passes a double-tilde-separated list of data values to the plugin. This argument/value pair can be omitted if you are not passing data. It is shown here with an empty string only for clarity. See how a hotspot passes data values to the plugin. |
| warnings | Lets you disable warnings for bad identifiers. The option is not shown in the example above, but to use it, add ", warnings", "off" at the end of the argument list. |
Using JSON templates
All of the examples in this documentation have been for templates that contain HTML. This is the simplest method and is recommended for most people.
Programmers may choose to use JSON templates if they prefer to only obtain data from Omeka items and write their own JavaScript logic to create the HTML that will present the data.
Below is an example of a JSON template followed by an example of the Live Data response.
Template: Example6, Identifier, JSON
{
   "title":"${element, Title}",
   "image":"${file, thumbnail, url}",
   "width":"${file, thumbnail, width}",
   "height":"${file, thumbnail, height}",
   "link":"${item, url}"
}
{
   "title":"Southwest Harbor Motor Co.",
   "image":"https://myomekasite.net/files/thumbnails/10247.jpg",
   "width":"300",
   "height":"246",
   "link":"https://myomekasite.net/items/show/6861"
}
Important: When you use a JSON template, your map must make Live Data requests for data instead of making Live Data requests for hotspot content.
Developing a JSON template
The MapsAlive plugin does rudimentary validation of JSON code to ensure that it is well-formed, but if there's an error, it won't tell you where the error is. To determine the cause of a JSON error, try using an online tool like https://jsonformatter.org/ or https://jsonformatter.curiousconcept.com/.
A good way to develop a JSON template is to test the template by calling it directly from a browser before using it in a Live Data call from the map. For example, you could test the template above by typing a URL like this into your browser:
https://myomekasite.net/mapsalive?template=Example6&items=1100
The browser will display JSON like in the example above.
Note that when you use this technique with an HTML template, the result will also be JSON, but in the form shown below. It's the form that MapsAlive expects for a Live Data response that is returning HTML. To learn more, see the JSON response section in the MapsAlive user guide.
{
    "html":"the HTML from the template"
}
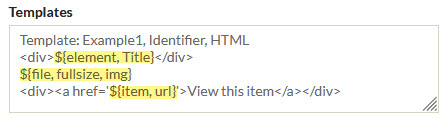
Styling with CSS
The examples in this documentation have deliberately been kept simple, but in practice you'll usually want to include CSS class names in your HTML templates so that the map's CSS can style the HTML elements.
The HTML below contains class names wrapper and title-element that make it easy to apply styling.
Template: Example1, Identifier, HTML
<div class='wrapper'>
    <div class='title-element'>${element, Title}</div>
    ${file, fullsize, img}
    <div class="view-link"><a href='${item, url}'>View this item</a></div>
</div>
The first screenshot below shows what the HTML looks like without styling and the second screenshot shows what it looks like with styling.
The CSS for the second screenshot appears below.
Here is CSS you can copy/paste into the CSS section on the Custom HTML screen in MapsAlive.
.wrapper img {
border: 2px solid black;
margin-bottom: 8px;
}
.wrapper {
padding: 4px 12px 0 12px;
text-align: center;
}
.title-element {
font-size: 18px;
font-weight: bold;
margin-bottom: 4px;
color: firebrick;
}
.view-link a {
color: green;;
font-size: 16px;
text-decoration: none;
}