Accessioning and Curating
This section describes how the Southwest Harbor Public Library (SWHPL) performs accessioning and curating for its Digital Archive. The information is provided solely for information-sharing purposes.
For an overview of this topic watch a one-hour video presentation.
At SWHPL (pronounced swiple, rhymes with triple), accessioning is the process of transferring archival materials from a donor, or the backlog, and recording information about the accession in the Library's accessions database. Curating is the process of making the materials in an accession publicly accessible as searchable and viewable items in the Digital Archive.
Contents
- Accession and curation goals
- Terminology
- Accessions vs Collections
- Backlog reduction strategy
- Accessioning and curating workflow
- Accessions database
- Accession index
- How To
- Accepting a donation for accession
- Tools
History
In early 2020, SWHPL had no formal accessioning and curating process and no longer had a curator. At that time, the Digital Archive already had more than 10,000 items and an even greater backlog of materials that are not accessible to the public. In an effort to reduce the backlog and better handle new donations, George Soules and Elliot Santavicca developed an initial accessioning process. In October 2022, George assumed the role of interim curator. He and archivist Sadie Cooley, with support from Library director Erich Reed, worked together to refine and document the accessioning and curating process described here.
Accession and curation goals
The process described here was developed to achieve the following goals:
- Accessibility — Make items accessible to the public as quickly as possible.
- Efficiency — Use a process that can be performed quickly and easily with limited resources.
- Backlog reduction — Reduce and eventually eliminate the Library's backlog of items.
- Transferability — Ensure that the process can be transferred to others in the future.
Accessibility
The primary goal at SWHPL is to make as much useful information (metadata, images, and searchable documents) available to the public as quickly as possible via the Digital Archive. This is easier said than done given the Library's enormous backlog of archival materials which were acquired during the past several decades.
In the early days, SWHPL archivists had the luxury of researching and documenting items one at a time before making them publicly available. While such thorough curation is still the holy grail, today, the primary and realistic goal is to make it possible for the public to find what the Library possesses even though detailed information about individual items might not yet be available. This is not a case of quantity vs quality, but rather one of broad vs deep. It is better for a researcher to discover an uncurated photograph than to not know it exists.
Efficiency
SWHPL achieves its accessibility goal by following an accessioning and curating process that is efficient and manageable regardless of the number of archivist hours available during any given period of time. While the most progress can made when ample human resources are available, the process must allow even a single part-time archivist to make progress toward achieving the goals of accessibility and backlog reduction. It must also allow new archivists and volunteers to quickly come up to speed and become productive.
The Library achieves its goal of efficiency by providing archivists with the right tools, and a documented process for using those tools, to accession and curate materials. This documentation describes those tools and processes.
Backlog reduction
An overarching goal at SWHPL is to reduce and eventually eliminate the Library's backlog of tens of thousands of digital and physical items. As the backlog is reduced, more and more items become publicly accessible. SWHPL works toward this goal by following a backlog reduction strategy.
Transferability
The accessioning and curating process must be such that responsibility for accessioning and the Digital Archive can be transferred to a new archivist with minimal dependence on institutional knowledge that resides only in the minds of a few individuals. Achievement of this goal is critical to ensure that the Library can continue to meet the other goals if key personnel leave the organization.
Terminology
This section defines the terms used throughout this accessioning and curating documentation. Italics within a definition refer to another term in this section
- Accession
-
In museum parlance, an accession is typically defined as one or more items acquired at the same time from the same source. This definition applies at SWHPL for new donations, but not for backlog items.
For new donations, the items are what was donated, for example, the contents of a shoebox. When a new donation consists of a large number of items, the archivist may divide the items into subs-accessions which are each more manageable than the accession as a whole (the primary accession).
When the accession is from the backlog, the items are whatever the archivist who creates the accession chooses. For example, they could choose all the physical items in a three-ring binder, or all the digital files in a folder on the archival hard drive. As with new donations, the archivist may divide the physical items or digital files into more manageable subs-accessions.
- Accessions Database
- A database, separate from the Digital Archive database, that SWHPL uses to record information about an accession and everything related to it such as donor and the location of digital files. Learn more in the Accessions database section.
- Accession Number
-
SWHPL uses a four-digit integer, starting at 1000, to identify an accession. An archivist assigns the next available number to each new accession. The number for a subs-accession is the accession number followed by a numeric suffix as explained in the definition for sub-accession.
The accession number appears in the Accession # field of Digital Archive items, though it's blank for most items. This is because most items were added to the Digital Archive before the accessioning and curating process was established.
Note that some items with a blank Accession # field belong to an accession that was recently created, but the Accession # fields for the accession's items were not updated when the accession was created because of the extra time that would be required to perform this bookkeeping task.
- Archival Hard Drive
-
A removable PC hard drive affectionately known at SWHPL as the terabyte drive. It contains the Library's extensive backlog of digital files. On August 22, 2017, the hard drive was locked to be read-only and three copies were distributed among three separate geographic locations for safe-keeping. One copy is located in a locked cabinet within the archive closet. At that time, SWHPL began transferring digital files to S3 to ultimately eliminate the need to access the hard drive.
As of November 2022, 22.5% of the folders on the archival hard drive (806 of 3575) had been accessioned and uploaded to S3, with the remaining folders still in the backlog.
- Archival Materials
- Photographic prints and negatives (including glass plates), documents, maps, ephemera, and various other kinds of flat (2D) objects. SWHPL has a small number of 3D objects that were acquired in the past, but now avoids accepting them as donations.
- Archive Closet
-
A locked room (formerly a large closet) on the second floor of the Library where physical archival materials are stored. The room contains four shelving units and each shelf within a unit is numbered. For example, the first shelf on unit 1 is 1-1, and the third shelf on unit 2 is 2-3.
The binders and boxes on each shelf are labeled with an accession number. In some cases, the contents of an accession are kept on multiple shelves. The accessions database contains an Archive Closet table showing a photograph of the shelf's contents so that an archivist can look at a shelf without going into the closet.
- Backlog
-
Physical and digitized versions of archival materials that have not yet been accessioned and have not been added to the Digital Archive.
A factor that contributes to the backlog is the ongoing acquisition of new items that donors gift to the Library. Archivists must choose whether to devote their limited time to making new items publicly accessible versus making items from the backlog publicly accessible. New items that are not immediately added to the Digital Archive implicitly become part of the backlog, thus increasing its size.
- Collection
-
At SWHPL, a collection is a name such as "The Smith Family Collection" used to identify a set of items that came from the same donor or are of a similar nature such as a postcard collection. In the Digital Archive, if an item belongs to a collection, the collection name is specified in the item's Source field. Many items do not belong to a collection because they were added to the Digital Archive before consistent use of collection names was established.
Items in a collection often come from multiple accessions. For instance, each donation from the Smith family would be assigned to separate accessions, but the items in each accession would belong to the "Smith Family Collection".
If the items in a collection were added to the Digital Archive before the accessioning and curating process was established, those items will not be associated with any accessions.
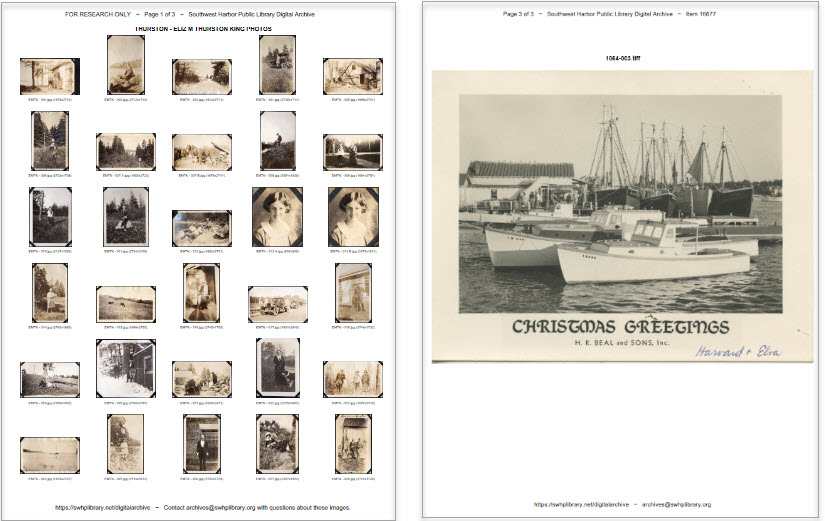
- Contact Sheet
- A PDF file containing one or more pages where every page in the file is either 30-up or 1-up. Each 30-up page contains six rows and five columns of thumbnails. The 1-up contact sheet show one image per page. Archivists create these using the contact sheet app described in the Tools section.
- Curated Item
- A Digital Archive item that has metadata and file attachments. All Digital Archive items are curated items with the exception of uncurated accession items.
- Curation
- At SWHPL, curation refers to selecting, identifying, organizing, storing, digitizing, relating, and writing metadata for archival materials, and ultimately, adding them to the Digital Archive.
- Google Drive
- A Google Drive that is shared with Library personnel and the curator or other archivists who are not Library employees. The drive contains documents (such as accessioning policies and procedures), copies of software tools, and other files that archivists utilize as part of the accessioning and curating process.
- Item
- Generically, an item is a single object (physical or digital) such as a photograph, document, map, or book. In the Digital Archive, an item is an Omeka item which is a record in the underlying MySQL database.
- Item Number
- SWHPL uses an integer, starting at 1000, to identify a single item in the Digital Archive. The item number is generated automatically by the Digital Archive and appears in the item's Identifier field. As of November 2022, the most recent item number was around 16680.
- New Donation
- A donation of physical or digital items from a donor that was made starting around the year 2020 when the accessioning and curating process described here was first implemented. The word "new" distinguishes these donations from those made prior to 2020.
- Primary Accession
- An accession that has one or more sub-accessions. Primary just means the entire original accession before it was divided into sub-accessions.
- S3
- Cloud storage using Amazon's Simple Storage Service. S3 is an integral part of SWHPL's accessioning and curating process. Learn about using S3.
- Sub-accession
-
A part of an accession that has been separated from the accession as a whole (the primary accession). For example, if the accession for a new donation consists of a photo album, a packet of letters, and a variety of miscellaneous objects, an archivist might choose to create one sub-accession for the album, another for the letters, and a third for the rest.
A sub-accession gets its own accession number which is the primary accession number followed by a suffix. For example, if the primary accession number is
1234, the sub-accession would be identified as1234_01,1234_02,1234_03and so on.Utilization of sub-accessions is a key element of the Library's backlog reduction strategy.
Except where stated otherwise, a sub-accession is treated the same way as an accession with regard to the process. For instance, a sub-accession gets its own record in the Accessions table just like a primary accession.
- UA
- See uncurated accession item.
- Uncurated Accession Item
- An uncurated accession, referred to as a UA, contains items that have not yet been individually or collectively curated, except for creation of an index, to derive metadata to describe them. An uncurated accession item is a Digital Archive item that makes the UA's index, and contact sheet, accessible. Eventually, items that are part of a UA are added to the Digital Archive as curated items.
Accessions vs Collections
It is important to understand the difference between accessions and collections. Items in an accession are associated with one another by virtue of the fact that they were all accessioned together at the same time from the same source.
The items in an accession might or might not be related to or be similar to one another. For instance, one shoebox might contain closely related items such as letters all written by the same person, whereas another shoebox might contain a completely random set of objects like a map, a photograph, and a document, none having anything to do with the others. An accession simply records what the Library received from whom on what date.
In contrast, all of the items in a collection have one of two kinds of association with one another. The first kind is when all the items came from the same source, such as the Smith family, even if the items are dissimilar such as a random set of things that the Smith's collected over time. The second kind of association is when the items are somehow similar to each other such as a collection of postcards or glass plates.
Over time, the Smith family might make several donations. Each donation is recorded as a separate accession, but all of the items from all of the family's donations are identified as belonging to the "Smith Family Collection".
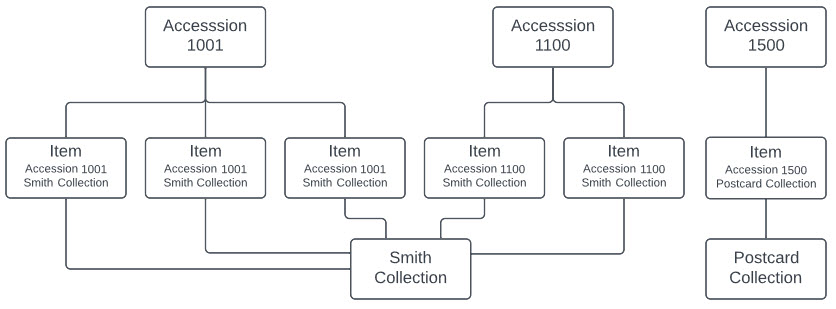
In the Digital Archive, an item's Source field shows what collection, if any, an item belongs to. If a user clicks on the collection name's hyperlink, they will see a list of all other items that are in that collection. At item's Accession # field shows what accession, if any, an item belongs to. If a user clicks on the accession number's hyperlink, they will see a list of all other items that are part of that accession.
The diagram below shows the distinction between accessions and collections. The fives items from the two accessions 1001 and 1100 belong to the single "Smith Collection". The single item from accession 1500 belongs to the "Postcard Collection". Both collections might also contain items that were added to the Digital Archive before the accessioning and curating process was established.
Backlog reduction strategy
As of November 2022, the Library did not know the exact number of items in the backlog because most were acquired before the Library followed the accessioning and curating process described here. The number is, however, overwhelmingly large when you count the tens of thousands of digital files and thousands of physical items.
Desmond Tutu once said that “there is only one way to eat an elephant: a bite at a time.” What he meant is that everything in life that seems daunting, overwhelming, and even impossible can be accomplished gradually by taking on just a little at a time.
Tutu's philosophy applies to backlog reduction, but only when combined with an efficient accessioning and curating process. Without a process to guide them, an archivist is like a deer in the headlights staring at what seems like an insurmountable challenge and not knowing how to approach it or get it under control. Simply taking one bite at a time is not enough because it will take forever.
What doesn't work
Before describing how SWHPL eats the elephant, let's discuss a strategy that is not effective at achieving the Library's accession and curation goals.
- Randomly curating one item at a time.
- Devoting effort to the newest things instead of the most important.
- Attempting to curate a large accession from start to finish.
- Being consistent for consistency's sake.
- Letting perfect become the enemy of good.
The list above describes a linear, shinier is better process whereby archivists attempt to eat and digest every bit of the elephant, starting at the trunk and working toward the tail, but then switching to devour a new beast when one comes along. This approach equally favors important and unimportant items and wastes time performing unproductive tasks such as indexing and labeling every item in an accession instead of only those that are the best candidates for the Digital Archive.
Another fault with this process is that it delays making an item accessible to the public until it has been fully researched, digitized, and post-processed to look as good as possible. A better approach would be to make a good-enough version of the item available and then track what additional tasks could be performed in the future to make it even better.
What does work
The list below highlights the key elements of the strategy that SWHPL employs.
- Prioritizing items and tasks based on the accession and curation goals.
- Dividing large accessions into sub-accessions and processing them in steps.
- Making partial information about not-yet-curated items available to the public.
- Only performing work that contributes to the goals.
- Quickly producing a quantity of good results instead of a minuscule amount of perfect results.
This list describes a holistic process that divides the work into prioritized pieces. Multiple pieces can be worked on in parallel by different people. Each piece can be worked on in steps by individuals. The amount of work required to complete a step can be easily managed by a single archivist in a small amount of time and every step contributes toward the accession and curation goals. Most importantly, the steps are sequenced in a way that makes partial information about items available to the public without waiting until all steps for that item have been completed.
The importance of sub-accessions
A key element of the backlog reduction strategy is the division of large accessions into sub-accessions. This division breaks the work of processing a large accession into manageable pieces that can each be started and completed by one person in an estimable amount of time. It also allows the grouping of similar items which organizes the primary accession and introduces the efficiency of processing like items all at the same time,for example scanning all the negatives in one sub-accession and then creating PDFs from documents in another sub-accession.
How archivists use sub-accessions is different for the physical backlog than for the digital backlog.
Physical backlog
Use of sub-accessions for the physical backlog is best understood by an example.
The Library accepts as a gift a crate containing a photo album, a manila folder full of documents and type-written letters, and a box of glass plate negatives. An archivist creates a new accession, number 1234, and labels the crate with that number. The curator determines that of all the items, the letters are of most immediate interest because they were written by someone for whom the Library often receives requests for information.
Since it could be quite a while before a volunteer becomes available to scan and OCR the letters, the curator assigns an archivist to create an index for them.
Upon receiving this assignment, the archivist:
- Creates a sub-accession for the letters and assigns it number
1234_01. - Removes the letters from the crate and puts them in an archival box labeled with that number.
- Puts the box on a shelf in the archive closet, perhaps next to, but not inside the crate.
- Creates an index for the letters.
- Adds the index to the Digital Archive as an uncurated accession item.
- Sets the Next Step for the sub-accession
1234_01toDigitize.
At this point, partial information about the letters is now accessible to the public, and the accession database records that the letters still need to be scanned. The remainder of the primary accession is still in the crate, and because the letters have been removed from the crate, archivists know that what's left in the crate has not yet been processed. Eventually, over time, as other items in the accession are deemed important enough to work on relative to everything else in the backlog, more sub-accessions will get created and the process just described will be repeated until the crate is empty and can be disposed of.
An empty crate does not necessarily mean that all items from the primary accession have been added to the Digital Archive. It may even be the case that none of the items have made it that far. This is because each sub-accession has its own Next Step such as Create index or Digitize. The crate's emptiness simply means that the entire primary accession has been divided into sub-accessions which can be worked on in parallel based on importance and availability of an archivist. In this example, it may be the case that nothing else in the primary accession is important as the letters and so archivists devote time to other accessions before eventually getting back to this accession one day.
Note that as an alternative to emptying the crate, you could store sub-accession items back in the create as long as they are within their own container that is clearly labeled. You'll know the create was "emptied" when all of its contents are sub-accessions.
Digital backlog
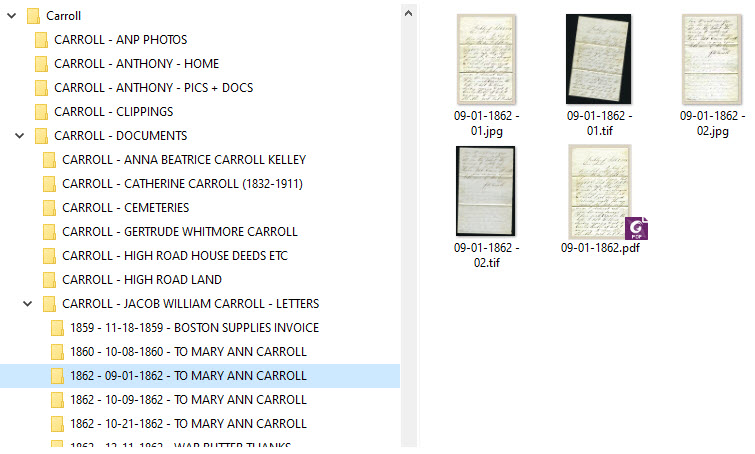
The SWHPL digital backlog consists of a hierarchy of nested folders that together contain tens of thousands of files. At the higher levels of the hierarchy, the folders are unrelated, but deeper down there are folders that contain sub-folders that are closely related. The screenshot below shows the Carroll folder and some of its 131 sub-folders which together contain 1,295 files.
Because everything in the Carroll folder is about the Carroll family, an archivist chose to treat the folder as a single accession, number 1002. Since an attempt to curate this accession as a whole would be overwhelming, the archivist broke off one piece, Jacob Carroll's letters, into a sub-accession 1002_01. This is the equivalent of removing the three-ring binder from the crate in the previous example. They recorded this action in the Accessions table as shown below.

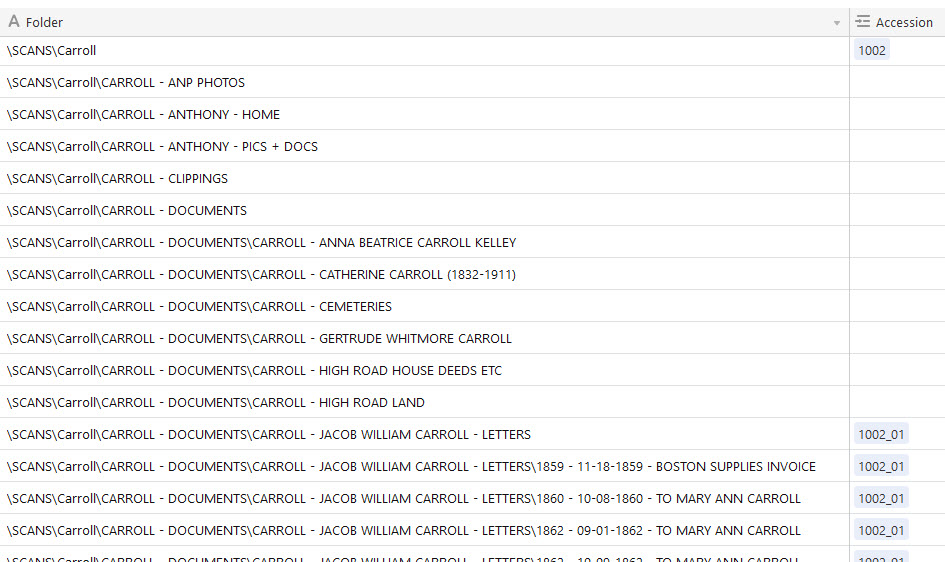
The archivist also updated the Digital Files table to mark CARROLL - JACOB WILLIAM CARROLL - LETTERS and its sub-folders as belonging to sub-accession 1002_01 as shown below.
Having performed the simple bookkeeping tasks just described, the archivist is free to focus solely on Jacob's letters without the burden of having to deal with the entire Carroll accession. Later they can choose another folder to break into a sub-accession.
One bite at a time.

The two previous examples demonstrated that it is not necessary to completely break an accession into sub-accessions at the outset. While that might make sense for a smaller accession, for a large one like the Carroll family, it would require evaluation of the entire accession of 1,295 files to determine how to divide it. That task alone could feel like trying to eat a whole baby elephant which is still a large creature. In contrast, by creating just one sub-accession, an archivist can quickly make its items available to the public and gain a sense of personal accomplishment from having contributed toward the goal of accessibility.
One-at-a-time creation of sub-accessions is manageable because of cross-checks that are built into the process. The cross-checks make it easy to see what parts of a primary accession have been broken out into sub-accessions and which have not. For physical accessions, the cross-check is whether the crate is empty. For digital accessions, the cross-check is whether the Accession column in the Digital Files table is filled in for every folder in the primary accession. In the screenshot above, it is obvious that many sub-folders in the \SCANS\Carroll folder have not yet become sub-accessions because the Accession column in their row is blank. Because those rows stand out, it's easy for an archivist to see which sub-folders have not yet been processed.
Accessioning and curating workflow
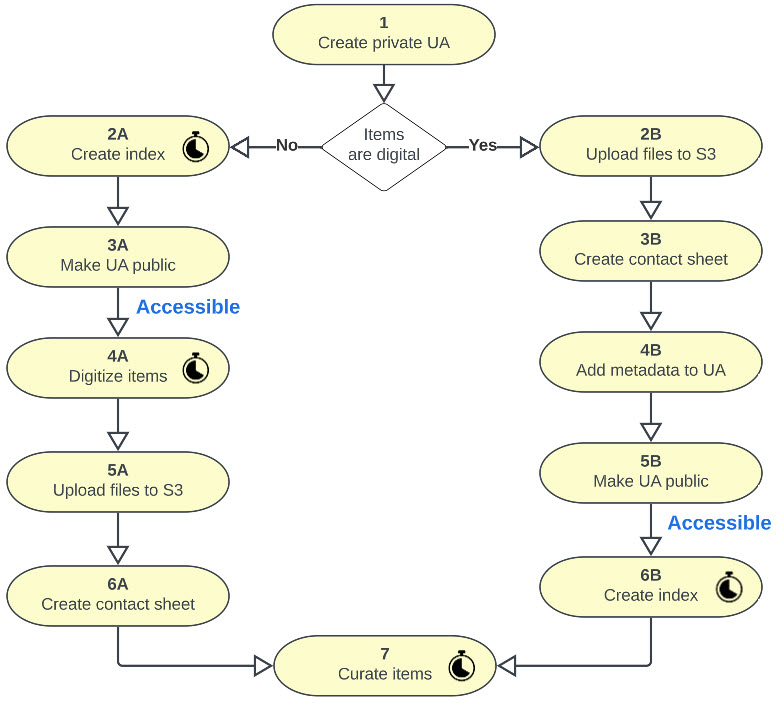
The flowchart below shows the sequence of steps in the accessioning and curating process. The process makes information about an accession's items publicly accessible as quickly as possible.
In the steps, the word "Accessible" in blue text indicates the point at which some information about the accession becomes publicly accessible. In the diagram, the stopwatch icons indicate steps that can take a long time, hours or even days.
There are two paths, A and B, which distinguish between the sequence of steps necessary for working with physical items versus digital items. Path A applies to donations of physical items, and to items from the physical backlog. Path B applies to accessions that come from the digital backlog and also for donations of digital files.
Workflow steps
This section explains each step in the workflow diagram shown above.
S3 accession folder
The steps below often refer to the "accessions's S3 folder" which, for a primary accession, is named using the accession number, but
for a sub-accession it is named using accession number\sub-accession number. For example, for primary accession 1012, the S3
accession folder is named 1012. For sub-accession 2026_02, the accession folder is named 2026\2026_02. This is because S3
sub-accession folders are contained within their primary S3 accession folder. Learn about using S3
In the steps below, #### means the accession number.
- 1 – Create private UA (Uncurated Accession)
-
This step results in an item identifier number which will be needed in subsequent steps.
- Add a new item (the UA) to the Digital Archive and leave it set to private.
- Set the item's Type to
Uncurated Accession. - Set the item's Accession # to the accession number.
- Provide as much metadata in other fields as is known about the accession's contents.
- Create a new S3 folder for the accession.
- 2A – Create index
-
This step produces a searchable index that makes a detailed description of the accession searchable via the Digital Archive.
- Follow the instructions for creating an accession index.
- Upload the PDF and Word files to the S3 folder.
- Attach the index to the UA:
- In the Digital Archive, edit the item created in step 1.
- Go to the Files tab to see the contents of the accessions's S3 folder.
- Check the box for the index PDF file.
- Save the item.
- Verify that the index PDF appears as the item's image.
- Add a relationship from the UA to a relevant Reference Item if one exists.
- 3A – Make the item public
- Change the UA from non-public to public.
- 4A – Digitize items
- Scan or photograph the items in the accession to create digital files. Name the files according to their identifiers in the index file created in step 2A.
- 5A – Upload files to S3
- Upload the accession's files to the accessions's S3 folder.
- 6A – Create contact sheet
-
This step creates a PDF file containing thumbnails of the accession's items.
- Go to the folder on your computer that contains the digitized items.
- Remove any files that should not appear in the contact sheet.
- Run the contact sheet app and choose
30-upas the contact sheet type. - The app will save the file within the folder as
accession-contact-sheet-####.pdf. - Upload the contact sheet to the root level of the accession's S3 folder.
- Attach the contact sheet to the UA:
- In the Digital Archive, edit the item created in step 3A.
- Go to the Files tab to see the contents of the accessions's S3 folder created in step 4A.
- Check only the box for the contact sheet PDF file uploaded in step 8A.
- Save the item.
- Verify that the contact sheet appears as the item's first image.
- Update the Accessions table to set the accession's Next Step to
Add item to DA.
- 2B – Upload files to S3
- Upload the accession's files to the accessions's S3 folder.
- 3B – Create contact sheet
- Same as step 6A above.
- 4B – Add metadata to UA
- Write a paragraph or two in the UA's Description field describing the contents of the contact sheet. Use keywords that will help someone find the UA. This step is very important, especially if the file names in the contact sheet are not meaningful and thus won't contribute to searchability.
- 5B – Make the item public
- Change the UA from non-public to public.
- 6B – Create index
- Same as step 2A above.
- 7 – Curate items
-
At this point, accessioning is complete and the work of curating begins. For most accessions, only the most important items will be added to the Digital Archive as individual items.
One criterion for whether an item gets added to the Digital Archive is whether there is sufficient knowledge of the item to provide metadata that distinguishes the item from other items. Typically, this information comes from the index or other supplementary documentation that is included with the accession, but it may be necessary to research the item to obtain additional information.
Accessions Database
SWHPL uses Airtable as its accessions database. The database records information about accessions and related information. The diagram below shows five tables in the database followed by explanations of each table.
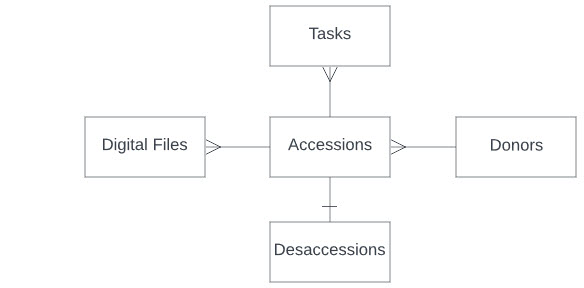
The lines connecting the tables indicate the relationships between tables.
-
The Tasks table has a many-to-one relationship with the Accessions table. This means that multiple records in the Tasks table can be for the same accession, but a Tasks table record can be for only one accession. For example, one task could be to index accession 1234 while another task could be to perform research on accession 1234.
-
The Donors table has a one-to-many relationship with the Accessions table. This means that a record in the Donors table can be for more than one accession, but a record in the Accessions table can have only one donor.
-
The Digital Files table has a many-to-one relationship with the Accessions. This means that multiple records in the Digital Files table can be for the same accession, but a Digital Files table record can be for only one accession.
-
The Deaccessions table has a one-to-one relationship with the Accessions table. This means that a record in the Deaccessions table can be associated with only one record in the Accessions table and vice versa.
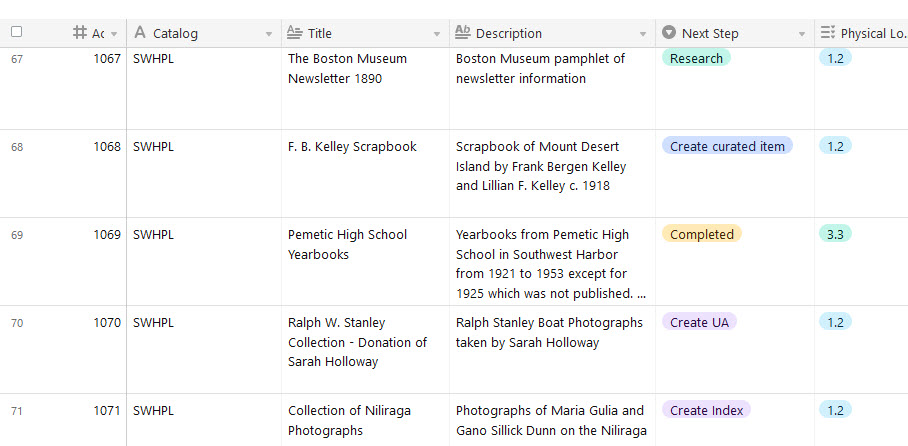
Accessions table
The Accessions table contains one record for each SWHPL accession. The records contain fields for storing information that is specific to a single accession such as the Id of the donor, but not information about the donor. The donor information is kept in the Donors table because the same donor could be associated with more than one accession.
Learn how to add a new accession to the Accessions table.
The screenshot below shows just some of the fields and a few of the rows of the Accessions table. Note the Next Step field which indicates where each accession is within the accessioning and curating process.
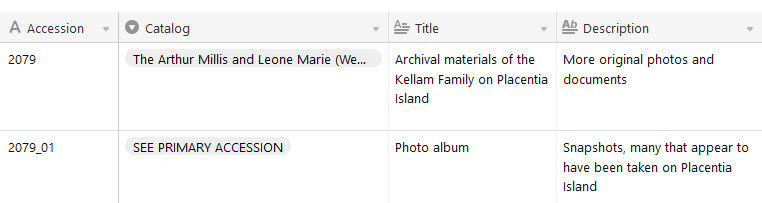
Sub-accessions
Sub-accessions appear in the Accessions table immediately below their primary accession (when the view is sorted by the accession number) as shown below.
Prioritizing accessions
The Accessions table contains a Priority field that is set by the curator to rank an accession relative to other accessions with regard to when the accession should get attention. The priority values 1 to 5 represent lowest to highest priority, except for 0 which means not yet determined. A way to think about the values 1 to 5 is: lowest, low, medium, high, and highest priority. Very few accessions should have priority 5. Only use 5 to identify accessions that should soon make their way into the Task table. An accession with priority 1 is so unimportant that perhaps it should be deaccessioned.
An accession's priority should not be interpreted to indicate its importance within the collection, though that is usually the case. The curator may temporarily assign a high priority to accessions of lower importance for administrative purposes. For example, while assessing a set of accessions to determine their importance, the curator may set the priority of each to 5 so that they can then view all the accessions grouped by priority and have those accessions all appear in the same group.
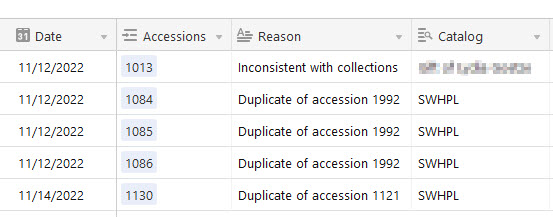
Deaccessions table
The Deaccessions table is used to keep a record of which accessions have been deaccessioned. A deaccessioned record still exists in the Accessions table so that information about it is never lost, but the Accessions table is normally filtered to hide records for accessions in the Deaccessions table.
Learn how to deaccession an accession.
The screenshot below shows most of the fields and a few of the rows of the Deaccessions table.
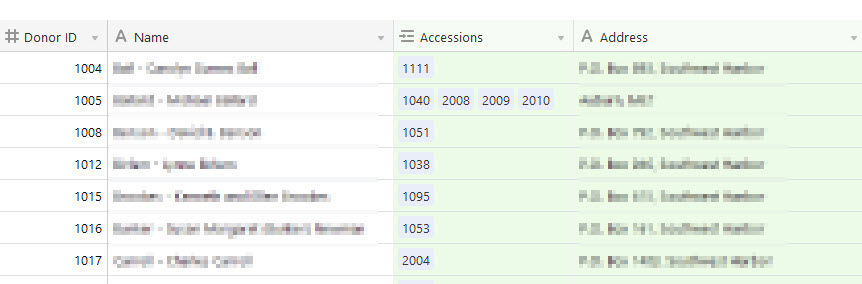
Donors table
The Donors table contains information about each unique donor. It also shows which accessions the donor has given. You can double-click on an accession number to see the information for that accession. SWHPL uses donor ID 1000 to indicate that the donor is unknown.
Learn how to add a new donor to the Donors table.
The screenshot below shows some of the fields and a few of the rows of the Donors table.
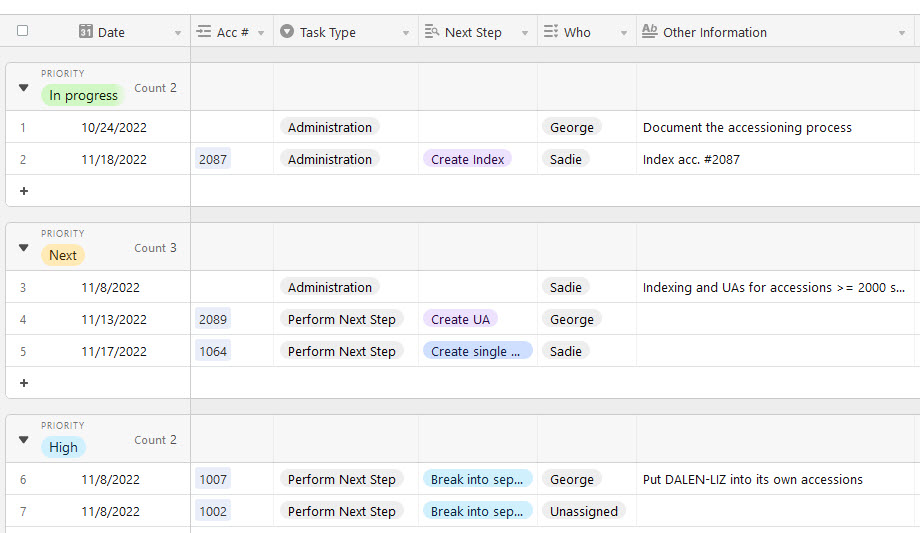
Tasks table
SWHPL uses the Tasks table to achieve the efficiency goal described earlier. The purpose of the Tasks table is to allow the curator to quickly see who is doing what, and to make it easy for archivists to know what they should be working on.
The Tasks table should always reflect reality based on the availability of resources. For example, if at the present time no
archivists are available to work, there should be no In Progress tasks. If a task was in progress when an archivist
becomes unavailable, its Stage should be changed (perhaps to Next or Queued) to record where the work should be picked up when resources become available again.
Learn how to add a new task to the Task table.
The screenshot below shows the fields and rows that are typically visible in the Tasks table at any given time. You want to minimize the number of In Progress and Next tasks so that the table only shows work that is being performed or is slated to be performed very soon.
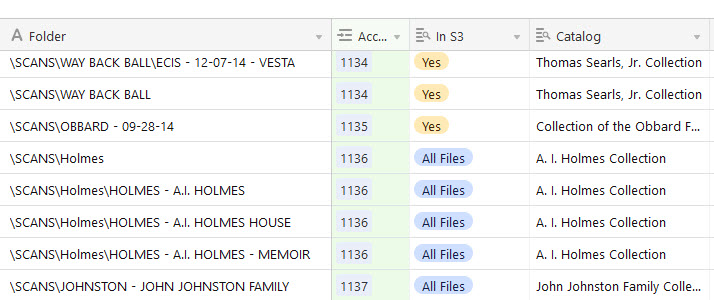
Digital Files table
The Digital Files table is the largest SWHPL table. It contains more than 3,500 rows representing the more than 3,500 folders on the archival hard drive. Little by little, SWHPL archivists create accessions from the folders, chipping away at the enormous backlog. In the process, they discover folders that can be rejected for various reasons such as being redundant or containing files with insufficient quality. The table contains a Rejected field (not shown in the screenshot below) to record the reason a folder was rejected.
You may never need to add a record to the Digital Files table. If you do, add it manually, using existing records as examples.
An important use of the Digital Files table at SWHPL is to track which folders on the archival hard drive have been uploaded to S3 as part of the accessioning and curating process. When every row in the table has an accession associated with it (or has been rejected), the entire backlog of digital files will have finally been accessioned and stored in S3.
The screenshot below shows some of the fields and a few of the many rows of the Digital Files table.
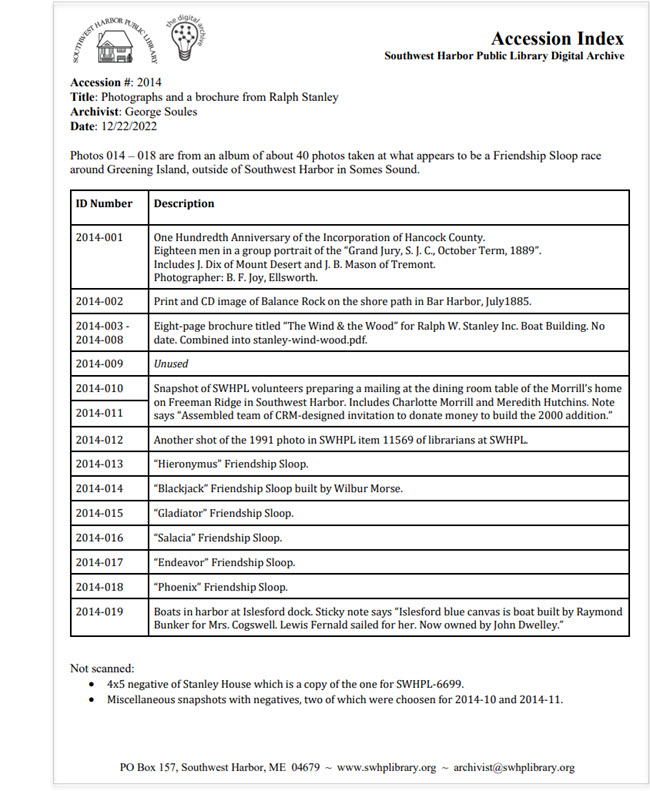
Accession Index
An accession index is an inventory of what's in an accession. The index contributes to the goal of accessibility by making the contents of an accession searchable even if the accession's individual items have not yet been added to the Digital Archive.
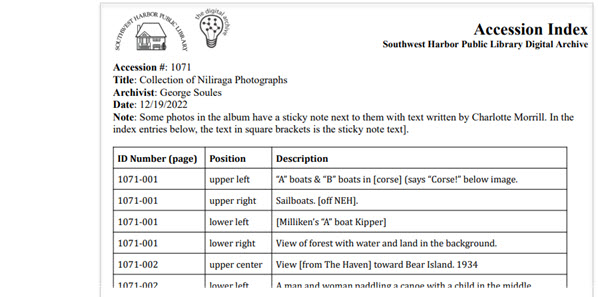
In most cases, an archivist creates an accession index as a Word document and then converts it to a PDF file. Below is an example of a typical accession index.
For some accessions it is sufficient to create a very simple index and paste it into the Description field for the accession's Digital Archive item. Below is an example of this kind of accession index.
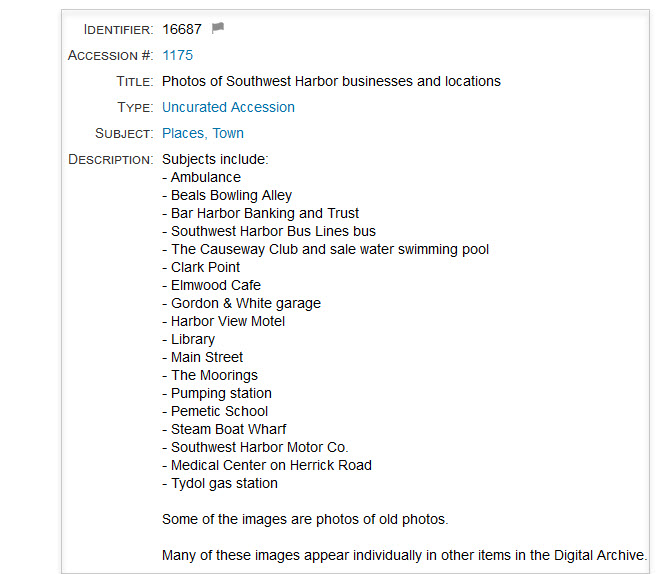
The simpler index would be appropriate when little is known about the individual items, or as a way to quickly make an accession accessible when there is not enough time to create a more detailed index. The simpler index can also be sufficient if the accession has a contact sheet containing keyword-rich file names which add to the accession's searchability.
Creating an accession index
This section explain the key elements involved in creating an accession index:
- Curator assessment of the accession
- Item ID numbers
- Accession index template
- Metadata
- Curator approval of the index file
Curator assessment of the accession
Before an archivist creates an index for an accession, the curator should assess the items in the accession to determine which items should be:
- Separated out because they don't satisfy the collection development policy.
- Assigned individual ID numbers and be listed on individual rows in the index.
- Treated as a set to be described on one row in the index.
- Eventually be digitized.
This assessment effort by the curator ensures that the time an archivist spends creating the accession index will be focused on items that the curator deemed most important.
Item ID numbers
Index creation and scanning are faster and easier when the accession items identified by the curator as needing ID numbers are labeled with those numbers before indexing or scanning the items. For prints and documents, this is usually done by writing the ID number in pencil in an inconspicuous place such as the back of the print or document. A pen may be required if pencil will not mark. If the item cannot be marked inconspicuously, the item can be placed in a clear sleeve with the ID number written on the sleeve with a sharpie. Do not rely on sticky notes for this purpose since they might detach leaving the item unidentified.
Pre-labeling the items ensures that the physical items match the items in the index which is especially helpful if the materials get mixed up while handling them.
The ID number is usually the accession number (or sub-accession number) followed by a hyphen followed by a three-digit number
with leading zeros. For example 2014-001, or 1071_03-071. If the item is already a digital file, the file name can
be used as the ID "number" or it can be renamed to follow the usual accession item numbering scheme.
When it comes time to scan the accession's items, the person doing the scanning uses the ID numbers as the item file names.
Accession index template
An archivist creates an accession index from a template. To use the template:
- Make a copy of the file named
accession-index-template.docxwhich is
located in the Google DrivePolicies and Proceduresfolder. - Rename the copy to
accession-index-####.docxwhere####is the accession number.
The template file contains two columns: ID Number and Description but you can add additional columns
to provide information that is unique to the items in the accession. For example, when scanning the pages
of a photo album without first removing each photo, and without marring the album pages with ID numbers,
you can identify photos by their position on the album page. The example below does this by using a Position column.
You can also add notes in the form of paragraphs above and/or below the table as shown in the examples in this section.
Auto-numbering index table rows
When creating a long index, you can save time by having Microsoft Word automatically number the index rows for you. Here are the steps to set up auto-numbering.
- Remove all but the first row from the template.
- Click in the
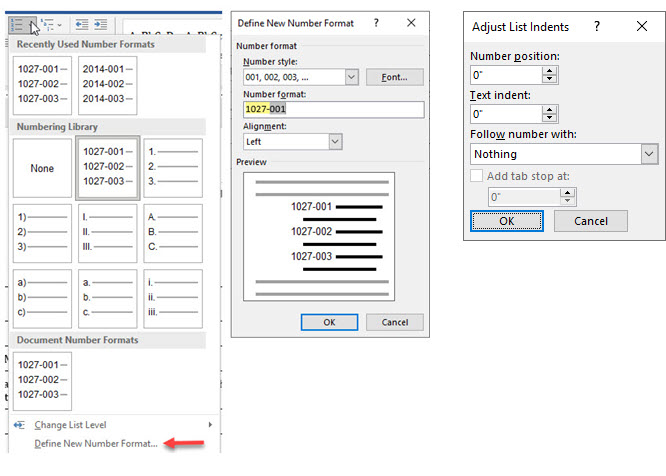
ID Numbercell of the first and only row. - On the Home tab expand the Numbering dropdown (see left screenshot below).
- At the bottom of the dropdown, click Define New Number Format... (red arrow in screenshot).
- On the Define New Number Format panel (see right screenshot below):
- Choose
001, 002, 003, ...for the Number style. - Edit Number format to use the accession number as a prefix e.g.
1027-or2026_03-. - Remove the period at the end of the Number format.
- Click the OK button.
- Choose
- A formatted number will appear in the cell.
- Right-click in the cell and choose Adjust List Indents... from the menu.
- Set Number position and Text indent to
0and chooseNothingfor Follow number with.
When you add a new row, the ID Number cell will get filled-in automatically with the next number.
The screenshots below show the dialogs and fields mentioned in the steps above.
Metadata
When filling out the description for index rows, use as many relevant keywords as possible since that text will be searchable. The words you choose will determine whether someone will be able to search for and find something of interest to them in the accession.
In the description, include as much metadata as you know about the item. For example, for a postcard, include the names of the publisher and photographer if known, a description of the postcard's photo (from the card's text or, if not provided, your own words), and the date if there is a postmark. If the back of the card is of interest, use two rows in the index, one for the front and one for the back, so that the person scanning the card will know to scan both sides.
To decide what metadata to include in the description, think about it this way. Later, when this item gets added to the Digital Archive, the metadata should be sufficient to fill in the item's fields just by looking at the index and the scan, without having to retrieve and handle the physical item.
When using acronyms, spell out the first instance, for example, write "Acadia National Park (ANP)" the first time instead of just "ANP".
Separated out items
When an accession contains items that the curator separated out, add a paragraph or a separate table to the accession index that briefly describes those items.
Curator approval of the index file
When the index is complete, the archivist:
- Submits the index to the curator for approval.
- Saves the approved index Word document as a PDF file named
accession-index-####.pdfwhere####is the accession number.
How To
The topics in this section explains how to perform common accessioning tasks.
Add a new accession to the Accessions table
Follow these steps to add a new record to the Accessions table for an accession or sub-accession.
- If the accession is from a new donor, first add the donor to the Donors table.
- View the Accessions table in Airtable.
- In the Views sidebar, click New Accession Form.
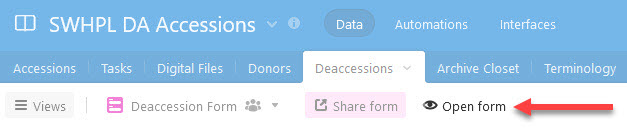
-
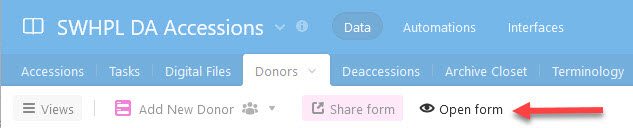
Click the Open form button in the top menu (red arrow in screenshot below).

-
A form like in the screenshot below appears.
- Fill in required fields.
- Use the next largest available number as the accession number.
- If a sub-accession:
- Append the next available sub-accession suffix e.g.
03to the accession number. - For the Catalog field choose
SEE PRIMARY ACCESSION.
- Append the next available sub-accession suffix e.g.
- Choose a next step for the accession.
- For accessions from the archival hard drive, use the form's Digital Files selector to choose the folders that are part of the new accession.
- Click the Submit button at the bottom of the form.
- A new record will be added to the Accessions table.
Always add new accessions using the New Accession Form, not by editing the table directly.
Using the form is easier and ensures that required fields are filled in.

Choose an accession's next step
This section explains the meaning of the values in the Next Step field in the Accessions table. The numbers in the Workflow column refer to numbered steps in the accessioning and curating workflow diagram.
| Step | Meaning | Workflow |
|---|---|---|
| Assess | Determine what the next step should be. Only choose this option for a new accession when it's not obvious what to do next such as when it's not known whether the accession items are already in the Digital Archive and the accession can be considered Completed or if an index is required, or if the accession is small enough that a curated item should be created from it or if a UA should be created. | 2 |
| Create index | Create an accession index PDF containing an inventory of what's in the accession. | 3A - 5A |
| Create curated item | Create a single Digital Archive item for the accession. Choose this option when the accession is small, and the items are all similar or closely related, and digital files exist for the items. | 3B - 6B |
| Create UA | Create an uncurated accession (UA) item for the accession. Choose this option when the accession is large, or the items are dissimilar or unrelated, or no digital files exist for the items. | 3A - 9A |
| Create contact sheet | Create either a 30-up or 1-up contact sheet. | 7A or 4B |
| Scanning | Scan or photograph items from the accession that are candidates for being added to the Digital Archive. | 6A |
| Add item to DA | Create individual curated items from the most important items in the accession. | 10A |
| Create sub-accessions | Divide the accession into sub-accessions that are each more manageable than the entire primary accession but are still considered to be part of the primary accession. | |
| Find materials | Choose this option when the location of the materials is unknown and they are needed for scanning or to return to the donor. | |
| Research | Choose this option when research must be performed before any other step can be performed. | |
| Special treatment | Choose this option when none of the other options apply. An example of special treatment would be to OCR the PDF files in an accession before proceeding with another step. Another example would be to reconcile confusing or contracting information about the accession. | |
| None | Additional work could be performed on the accession, such as scanning, but the items do not warrant further effort. | |
| Completed | All the steps for the accession have been performed and there is nothing else to do. |
Add a new donor to the Donors table
Follow these steps to add a new record to the Donors table.
- View the Donors table in Airtable.
- In the Views sidebar, click New Donor Form.
-
Click the Open form button in the top menu (red arrow in screenshot below).
-
A form like in the screenshot below appears.
- Use the next largest available number as the donor number.
- Click the Submit button at the bottom of the form.
- A new record will be added to the Donors table.

Add a note to an accession record
Archivists use the Notes field to record information about an accession that is not in any of the other fields. When an accession requires more than a few notes, add new notes at the top, prefixed with the date and archivist initials.
Use the notation <date>-<initials>:<text>
Example
11/23/2022 - SC: The donor will pick up the materials next June.
10/10/2022 - GS: Found the images for album #3.
10/06/2022 - GS: S3 contains all the folders except for album #3.
Deaccession an accession
You deaccession an accession by adding a record to the Deaccessions table.
Warning
Never deaccession by deleting a record from the Accessions table.
Doing so will cause all information about the accession to be lost.
Follow these steps to add a new record to the Deccessions table.
- View the Deaccessions table in Airtable.
- In the Views sidebar, click Deaccession Form.
-
Click the Open form button in the top menu (red arrow in screenshot below).
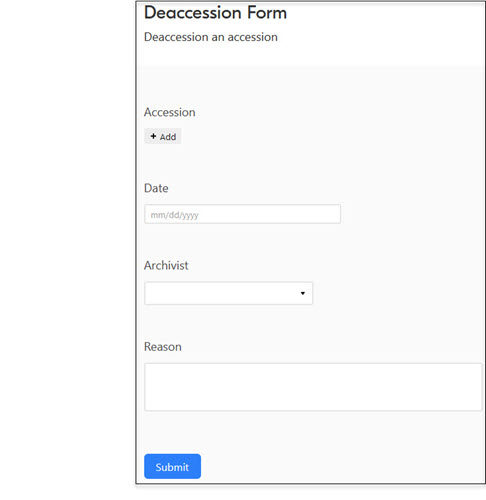
-
A form like in the screenshot below appears.
- Choose the accession to be deaccessioned by using the Accession selector
- Enter the date.
- Choose your initials from the Archivist field.
- Type a reason for the deaccession in the Reason field.
- Click the Submit button at the bottom of the form.
- A new record will be added to the Deaccessions table.
Scan documents and images
For detailed information on scanning, see the documentation on scanning.
Naming scan files using the accession number
Use the accession's index file as a guide for what file name to use for each item.
The file name format is ####-### where #### is the four-digit accession number and ### is the three-digit
item sequence within the accession. For example, the third file in accession 1071 would be named 1071-003.tiff.
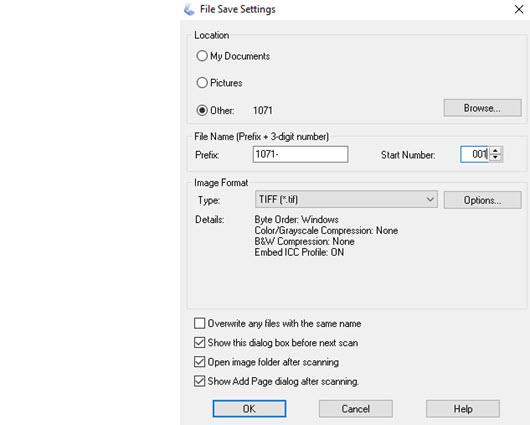
To have the Epson scanner software automatically create a sequence of file names:
- Click the File Save Settings button next to the Scan button (looks like a folder and a photo).
- On the File Save Settings dialog (see screenshot below):
- Choose
Otherfor the Location. - Browse to the folder where you want to save the scans for the accession.
- Set Prefix as
####-(include dash with no space after) where####is the accession number. - Set Start Number to
001or the next index number if the accession is partially scanned. - Set Image Format to
TIFF.
- Choose
- Click the OK button.
Accepting a donation for accession
When a donor offers to give or loan materials to the Library, the curator decides whether to accept some or all of the materials based on the accession’s relevance per SWHPL's Collection Development Policy. If the curator accepts the materials, the donor must sign the Library’s deed of gift form.
One criterion for accepting a gift is whether there is sufficient information about the materials from which an archivist can produce metadata. The information could be provided in written form by the donor, or it may be implicit in the materials such as text written on the backs of photographs.
For instance, an album of photographs with no information about each photo will generally not be as desirable as one where each photo is accompanied by words identifying the subjects, location of photos, and the photographer. If there is no such identification, and the subject or location of the photos is not obvious, the curator may opt to not accept the donation since it may be difficult or impossible to derive metadata.
Once the Library has opted to accept a donation:
- An archivist:
- Adds the new accession to the Accessions table.
- Procures a signed deed of gift form from the donor:
- Adds the new accession number to the deed of gift form.
- Scans the deed of gift form as a PDF and moves it to the Google Drive
Accessioning\Deeds of Giftfolder. - Stores the original signed form in the deeds of gift notebook in the archive closet.
- Stores the materials in the archive closet.
- The curator:
- Assigns a ranking to the accession to indicate its importance relative to other materials in the backlog. The ranking helps determine when the materials will be curated and added to the Digital Archive.
Collection development policy
The SWHPL collection development is the file Master - SWHPL DA Collection Development Policy mm-dd-yyyy.docx located in the
Google Drive Policies and Procedures folder. The curator will consult the policy to determine whether to accept all or part of a donation.
Deed of gift
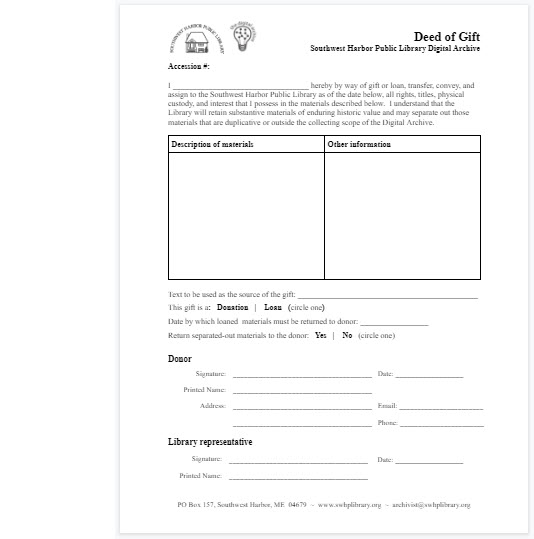
The deed of gift form records the transfer of materials from a donor to the Library. The form is in file Deed of Gift form mm-dd-yyyy.pdf on the Google Drive.
The archivist must ensure that the form is filled out properly per the descriptions below:
- Description of materials: A concise list of what is contained in the accession. If some of the items are contained within containers such as photo albums, the description should identify each container and its contents.
- Other information: Additional information about the gift or materials such as who collected the materials, or who could be contacted to get more information.
- Text to be used as the source of the gift: The exact wording that should appear in the Source field for Digital Archive items from the accession, for example, "The Smith Family Collection".
- Disposition of separated-out materials: Yes or no to indicate if the donor wants to receive back any materials that the Library chooses not to include in the accession.
The screenshot below shows a deed of gift form.
Storing physical items
Upon acceptance of materials from a donor for a new accession, the archivist performs these actions:
- Assigns the accession to a shelf on one of the shelving units in the archive closest.
- Records the shelf in the accession's Physical Location field in the Accessions table.
- If necessary, transfers the materials into an archival container such as a Hollinger box.
- Labels the container with the accession number. If the container holds other accessions, the archivist adds the label for the new accession to the other labels on the container. Photographs the shelf and updates the photo for that shelf in the Archive Closet table.
Tools
This section describes the software tools that SWHPL uses to carry out its accessioning and curating process.
Contact Sheet app
The Contact Sheet app is a custom-written Python application created for SWHPL by AvantLogic. It allows an archivist to create 30-up and 1-up contact sheets from a folder of files. Documentation will be added here in the future. Examples of a 30-up and 1-up contact sheet appear below.
Known issues
Here are problems that occasionally occur with the generated PDF file.
- An image sometimes appears with a black background. This occurs only with some, but not all images that are contained in a PDF that have transparency such as a PNG image. There is no known workaround.
- The image for a TIFF file will be white or almost white. This occurs if the scan was done using 16-bit Grayscale instead of the
recommended 8-bit Grayscale. You can fix the file without rescanning it in one of these two ways:
- Open the file in Irfanview and then save it as a new TIFF file. This will change the the file to use 8 bits per pixel instead of 16 bits per pixel.
- Open the file in Photoshop, change the Image > Mode to be 8 Bits/Channel instead of 16 Bits/Channel, and save the file.
AvantS3
See Using S3
PDF Editor
SWHPL uses both Foxit and Adobe Acrobat Pro for working with PDF files to:
- Combine TIFF files from the scanner into a PDF file.
- Perform optical character recognition (OCR) of images containing printed text.
- Optimize PDF files to make them smaller.
Epson scanner software
SWHPL uses Epson scanners and Epson drivers and programs.
To install the software on a PC, download the scanner driver and Epson Scan Utility for your scanner. The driver and software for the Epson V600 scanner is available here.
After you download the software:
- Open the
.exefile - Follow the installation steps
- Run the program using Professional Mode
Learn about scanning.
IrfanView
Archivists use the Irfanview Graphic Viewer utility to convert and resize image files.
Irfanview can do the following on individual files or on a batch of files:
- Resize images
- Convert TIFF to JPEG
- Rename files
- Many, many other features
As of November 2022, the current version of the 64-bit version for Windows was 4.60.
Resize an image to make it smaller
Follow the steps below to make an image smaller.
- Open the file in IrfanView
- Choose Image > Resize/Resample from the menu
- Choose the Set new size radio button
- Enter a Width or a Height but not both
- Click the OK button
- Choose File > Save (original folder) from the menu (or use Ctrl+S)
- To also convert the image to JPEG:
- Select
JPGfrom the Save as type dropdown
- Select
- Click the Save button
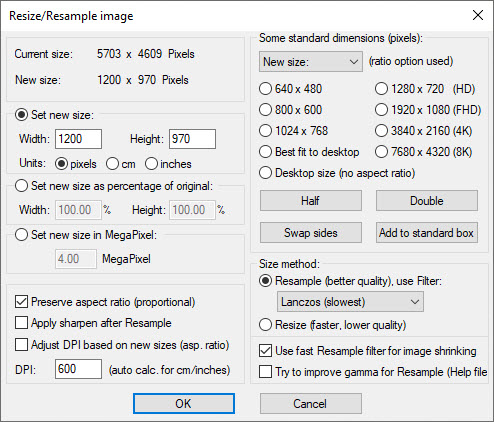
When creating a JPEG file to use as a Digital Archive item attachment, use 1200 for the width when the image
is wide or use 1200 for the height when the image is tall.
Convert TIFF to JPEG
Follow the steps below to convert a TIFF image to JPEG without resizing the image. To also resize the image, follow the resize steps in the previous section.
- Open the file in IrfanView
- Choose File > Save (original folder) from the menu (or use Ctrl+S)
- Select
JPGfrom the Save as type dropdown - Click the Save button
Zoomify
Used to create tiles for zoomable images in the Digital Archive.