GitHub and GitHub Desktop
Create a new repository
- Run GitHub Desktop
- Choose
File > New Repositoryfrom the top menu bar - For Name use the same name as the folder containing the files.
For example, if you are adding a new plugin located in
/plugins/AvantImport, typeAvantImportas the repository name. - Provide a Description or leave it blank (you can add one later in GitHub online)
- For Local path, choose the folder containing the folder that you want to make the repository from. For example,
navigate to
/plugins, not to theAvantImportfolder. - Check the Initialize this repository with a README checkbox
- Leave Git ignore as
None - Choose GNU GPLv3 for License
- Click the
Create Repositorybutton
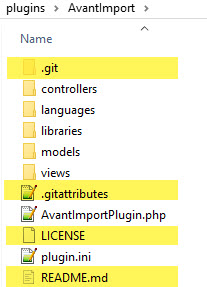
The folder now contains new Git files as shown in the example below for the newly created AvantImport
local repository. The files and folders highlighted in yellow were added by Git.
Publish repository to GitHub
To upload the local repository to GitHub:
- Click the Publish repository button at the top of GitHub Desktop
- On the confirmation dialog, uncheck or check the
Keep this code privatecheckbox - Click the Publish repository button
Rename a GitHub desktop repository
See this article.
- Rename it on github.com
- Sync with desktop github
- Close and repopen the desktop app.
Commit changes locally
As you make changes to files in your text editor and save them locally, you also see the changes in GitHub Desktop.
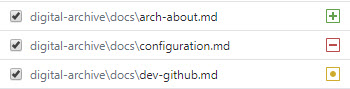
- The green icon indicates added files.
- The red icon indicates removed files.
- The yellow icon indicates modified files.
To commit the changes to the local repository (but not to GitHub in the cloud), you need to add a brief comment describing the changes and then click the Commit to master button.
Warning
By default, every change is selected with a check mark as shown above. The comment and subsequent commit will apply to all changed files in a single commit, but this is usually not what you want to do.
It is better to uncheck all the boxes and then comment/commit one at a time as explained below.
If you accidentally commit all the files, see how to rollback a commit
To commit changes:
- Uncheck all the changes and then select the file(s) that your comment will apply to
- Type a brief comment
- Click the Commit to master button
- Repeat until all the files you want to commit have disappeared from the list of changes
Push changes to GitHub
To push your committed changes to GitHub, click the Push origin button at the top of GitHub Desktop.
Create a new release
On the plugin's main GigHub page:
- Check that the plugin.ini file has the correct version. The version number there will be the one that appears on the Omeka Plugins page.
- Be sure all recent changes have been pushed from GitHub desktop.
- Click on the
Releaseslink in the right panel (not the link for a specific release) - Click the Draft a new release button. You must be logged in to see the button.
- Click the Choose a tag dropdown
- Type a tag in the form
v1.0.0 - Click Create new tag: v0.0.0 on publish
- Type a tag in the form
- Specify the release title in the form
Release v1.0.0 - Click the Publish release button
- In GitHub desktop, click the Fetch Origin button to get new tag into the local repository.
If you want the release to be published on the Omeka plugins site, follow the steps below. These steps will use the MapsAlive
plugin and tag v1.3 as examples.
- Read the Omeka instructions to Register an Addon.
- In Windows Explorer, go into the folder containing the plugin's repository e.g.
C:\xampp\htdocs\omeka\plugins\MapsAlive. - Update
.gitattributesper the Addon instructions. - Right click and choose
Git Bash Here. - Type
git archive --output=MapsAlive-v1.3.zip --prefix=MapsAlive/ v1.3. - In this example,
MapsAliveis the "Addon directory name" referred to in the instructions. - Press Enter.
- If you get
fatal: Not a valid object name, make sure that you did a fetch origin in GitHub desktop after publishing the release with that tag. - The command should have created a file named
MapsAlive-v1.3.zipthat contains one top-level folder namedMapsAlive. - On the GitHub site, edit the release by clicking the pencil icon.
- Drag the zip file into the section where you can attach binaries.
- Click the Update Release button.
Rollback a commit
Follow these steps to rollback a commit without losing any changes. Use this technique in the situation where you inadvertently commit a set of files as a group, but meant to commit them individually with separate comments for each.
- In Windows Explorer, go the folder for the repository requiring the rollback.
- Right click and choose
Git Bash Here - Type
git log –-onelineto see previous commits. - If the list is too long to fit, type ‘q’ to quit listing.
- Locate the commit that you want to revert to (near the top of the listing).
In the screenshot below, the most recent commit was
b7b3014. To undo it, you need to reset to8ae22a6. - Type
git reset ###where###is the ID of that commite.g. d1f4960. - Press
Enter - Type
exitto close the window. - Commit each of the files again, and when all of them are committed, push the changes to the server. If you don’t commit all of them before pushing, you’ll get an error when you do the push because the files on the server will be out of sync with the local repository.
Before the reset to 8ae22a6

After the reset

The steps above will move the Git HEAD pointer back to the older commit without modifying any of the files in the working directory. Thus, after performing these steps, all changed files will appear in the Git Desktop Changes tab so that you can commit them again.
Use of reset by itself is the same at reset --mixed. See this video to learn more.
If you want to rollback and also restore all files to their state at the earlier commit, do a
reset --hard, but be careful.
Note that for some reason copy/pasting from here into the Git Bash window does not work correctly. So just type commands manually.
Change the commit comment
Follow these steps in the situation where you typed the wrong commit message and you have not done any other commits (it’s the message for the most recent commit).
- In Windows Explorer, go the folder for the repository you need to change the message for.
- Right click and choose `Git Bash Here``
- Type
git commit --amend -m "new message. - Type
exitto close the window.
If you had already pushed the commit, you’ll need to push it again in which case you’ll see a ‘Merge branch’ commit in the history which presumably is syncing the old message on the server with the newly changed message.
See this post to learn about how to deal with older commits.
Untrack files already in a repository
From Jonathan Klughertz
If you have added/committed some files to your git repository and you then add them to your .gitignore, the files will still be present in your repository. Follow these steps to get rid of them and to ignore them in the future.
Step 1: Commit all your changes
Before proceeding, make sure all your changes are committed, including your updated .gitignore file.
Step 2: Remove everything from the repository
To clear your repo, use:
git rm -r --cached .
rmis the remove command-rwill allow recursive removal–-cachedwill only remove files from the index. Your files will still be there..indicates that all files will be untracked. You can untrack a specific file withgit rm --cached foo.txt
The rm command can be unforgiving. If you wish to try what it does beforehand, add the -n or --dry-run flag to test things out.
Step 3: Re add everything
git add .
Step 4: Commit
git commit -m "A comment about what you just did"
Your repository is clean. Push the changes to your remote to verify that the changes are effective there as well.