Rebuilding Elasticsearch Indexes
This page explains:
- What Elasticsearch indexes are used for
- When you need to rebuild them
- How to rebuild them
What Elasticsearch indexes are used for
Elasticsearch is an open-source, distributed search and analytics engine. Since its release in 2010, Elasticsearch has quickly become the most popular search engine. It is used by the Digital Archive for full-text search and for display of the facets in the Refine Your Search panel. Elasticsearch is the technology that makes it possible for Digital Archive users to search one site or all sites.
In the diagram below, each gold shape with "AWS" in the text represents a single Elasticsearch index. An index is like a database, but the index data is structured in a way that makes it possible to search and analyze huge volumes of data from multiple collections and get back results instantly.
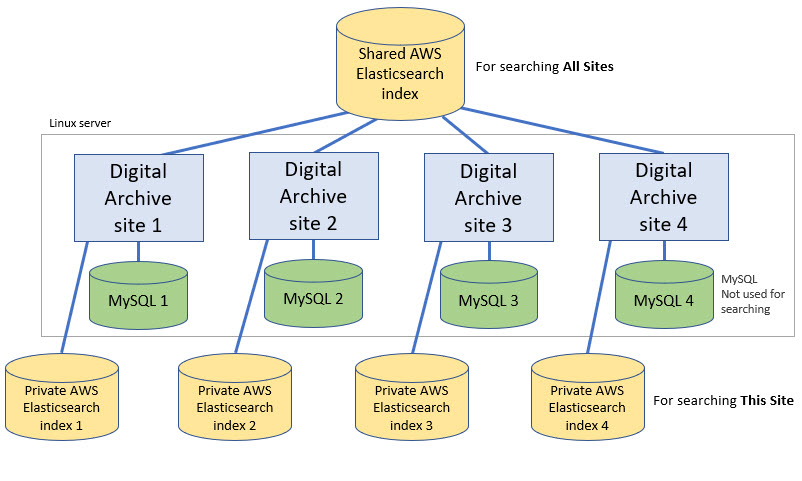
The Digital Archive is built on top of Omeka which uses a MySQL database to store the metadata for the items in your collection. In the diagram above, each green shape that says "MySQL" represents a single MySQL database for one collection.
The diagram shows that each Digital Archive site has one MySQL database and one private index. There is one more index, shown at the top of the diagram, that all sites share. It contains metadata from the public fields of the public items of all collections. Learn about public items and fields.
When you do a This Site search, the Digital Archive searches the private index. If you are logged in, the search returns results from both public and non-public items in the private index. If you are not logged in, it only returns results from public items in the private index.
When you do an All Sites search, the Digital Archive searches the shared index. All items in the shared index are public.
Keeping MySQL and the indexes in sync
When you add, edit, or delete an item in your Digital Archive:
- Omeka updates the MySQL database with your changes
- The Digital Archive's AvantElasticsearch plugin:
- Updates your site's private index with the same changes
- Updates the shared index with changes to public fields of public items
In other words, whenever you modify an item, the changes go into both the MySQL database and the Elasticsearch indexes so that both contain the same data. This same synchronization occurs when you use the Vocabulary Editor to edit a vocabulary term. The Vocabulary Editor updates all items that use the old term to use the new term and it applies the change to both MySQL and the Elasticsearch indexes.
When to rebuild Elasticsearch indexes
The synchronization mechanism described above works perfectly until you make changes using one of the "back door" methods listed below:
- Update metadata field values using the Bulk Metadata Editor
- Bulk edit or delete items using the Omeka Browse Items page
- Import into the Digital Archive from PastPerfect using the
bulkoption - Directly edit your MySQL database to rename an Omeka element
- Add or remove an Omeka element
- Change an element from private to public, or vice versa, by adding it to or removing it from the Private Elements option on the AvantCommon configuration page
- Import data using AvantImport
They are called "back door" methods because they bypass the Digital Archive synchronization logic. They update the MySQL database, but not the Elasticsearch indexes. This causes the MySQL database and the Elasticsearch indexes to get out of sync.
Fortunately, you will rarely perform any of these operations to make changes, but if you do, you must rebuild the indexes to get them back in sync with MySQL. If you don't rebuild the indexes, you'll see your changes when you are viewing an item, but search results will show the old values from before the changes were made. There's no harm done if this happens, but it can be confusing.
How to rebuild Elasticsearch indexes
Follow the step below to update your site's private (local) Elasticsearch index and the shared index so that both indexes are in sync with your MySQL database.
- 1 – Rebuild the Site Terms table
-
If you used a "back door" method listed above that changed the value of the vocabulary terms Type, Subject, or Place field in any record, you must rebuild the installation's Site Terms table before rebuilding the Elasticsearch indexes. This is necessary so that "back door" changes to vocabulary terms get added to the table.
If no vocabulary terms were changed, skip this step.
To rebuild the Site Terms table:
- Go to the Vocabulary Editor
- Click the Rebuild Site Terms table button
- Wait for the operation to report "Build Completed - Page will reload"
If you ever see
UNTRACKEDappear in the Refine Your Search panel, it's probably because Type, Subject, or Place fields were changed using a "back door" method and reindexing was performed without first rebuilding the Site Terms table. To get rid ofUNTRACKED, perform all of the steps in this section. - 2 – Go to the Elasticsearch Indexing page
-
Click on Elasticsearch in the left admin menu to see the page shown below.

In the steps that follow, do not change the value of the Indexing ID field.
- 3 – Export all items from Omeka
-
Select the first option
Export all items from Omekaand click the Start button.This step exports all of the items from the MySQL database into a form that will allow them to be imported into an Elasticsearch index. Exporting thousands of items can take a few minutes. During the export, progress messages will appear as shown below. In this example, it took nearly two and a half minutes to export data for almost 11,965 items. For a site with only a few hundred items, the export will only take a few seconds.
2020-07-21 16:30:58
Start export
Fetch items data from SQL database
Fetch file data from SQL database
Fetch tag data from SQL database
Begin exporting 11965 items
Export complete. 11965 items
File Attachments:
1618 - application/pdf (3,069.60 MB)
10174 - image/jpeg (6,390.44 MB)
48.85 MB written 0721-swhpl.json
Log file: 0721-swhpl-export.log
Memory used: 3.13 MB
Peak usage: 28.50 MB
Execution time: 149 seconds
DONE
- 4 – Import into a new local index
-
This step will create a new private (local) index containing the exported items.
Select the second option
Import into new local indexon the Elasticsearch Indexing page above and click the Start button. - 5 – Import into existing shared index
-
This step adds the exported items to the shared index.
Select the third option
Import into existing shared indexand click the Start button.The progress for this last step is shown below. Indexing is much faster than exporting.
11965 documents indexed (5,875.64 MB)
204 non-public documents skipped
Memory used: 0.84 MB
Peak usage: 117.95 MB
Execution time: 17 seconds
DONE
Important
Inform your site's archivists that you will be reindexing so that they do not edit items during that time. Or, you can temporarily disable everyone's accounts except your own.
While a site is being reindexed, it will be in an incomplete state. Someone searching the site may get incomplete or inconsistent search results. Because of this, its best to do reindexing during off hours like late at night or very early on a weekend morning.
If your internet connection goes down while reindxing, your site will be left in an incomplete state. If that happens, wait until you have a reliable connection, and then perform all of the steps again. If you are not comfortable with this task, contact your Digital Archive developer for assistance.